
At Home Pedicure to Save Money
Because of my strong dislike of wearing socks, I need frequent pedicures. I am on a debt-free journey currently, so I tried out a bunch of products and methods for the best at home pedicure. The initial investment is pretty low, you can get everything needed for less than $100 total, and typically don’t need to repurchase anything for at least 2 months.
This post contains affiliate links from which I make commission. As an Amazon Associate, I earn from qualifying purchases.
Mortified to be putting this on the internet, so I hope you all enjoy.
I know the before photo of my heel was a bit of a jump scare. I had abdominal surgery and had a really hard time bending over at all for a month. So I decided what better time than to let my heels get really bad, and show the world my at home pedicure.
What do I do to make my feet so angry you ask? Well, I live in California so flip flops are a constant in the summer, I swim (which dries out my feet), and I garden. But the most honest answer is that I hate my feet being enclosed. Socks, shoes, a man’s strong hands… Whatever it is, I don’t like it on my feet.
Because of my strong dislike of wearing socks, I need frequent pedicures. I am on a debt-free journey currently, so I tried out a bunch of products and methods for the best at home pedicure. The initial investment is pretty low, you can get everything needed for less than $100 total, and typically don’t need to repurchase anything for at least 2 months.
To make this as easy as possible for you, I made an idea list in my Amazon storefront with all of my favorite products, but I will also link them throughout the blog so if you only need one thing its an easier find.
Ok let’s get to the perfect at home pedicure!
Don’t forget the wine!
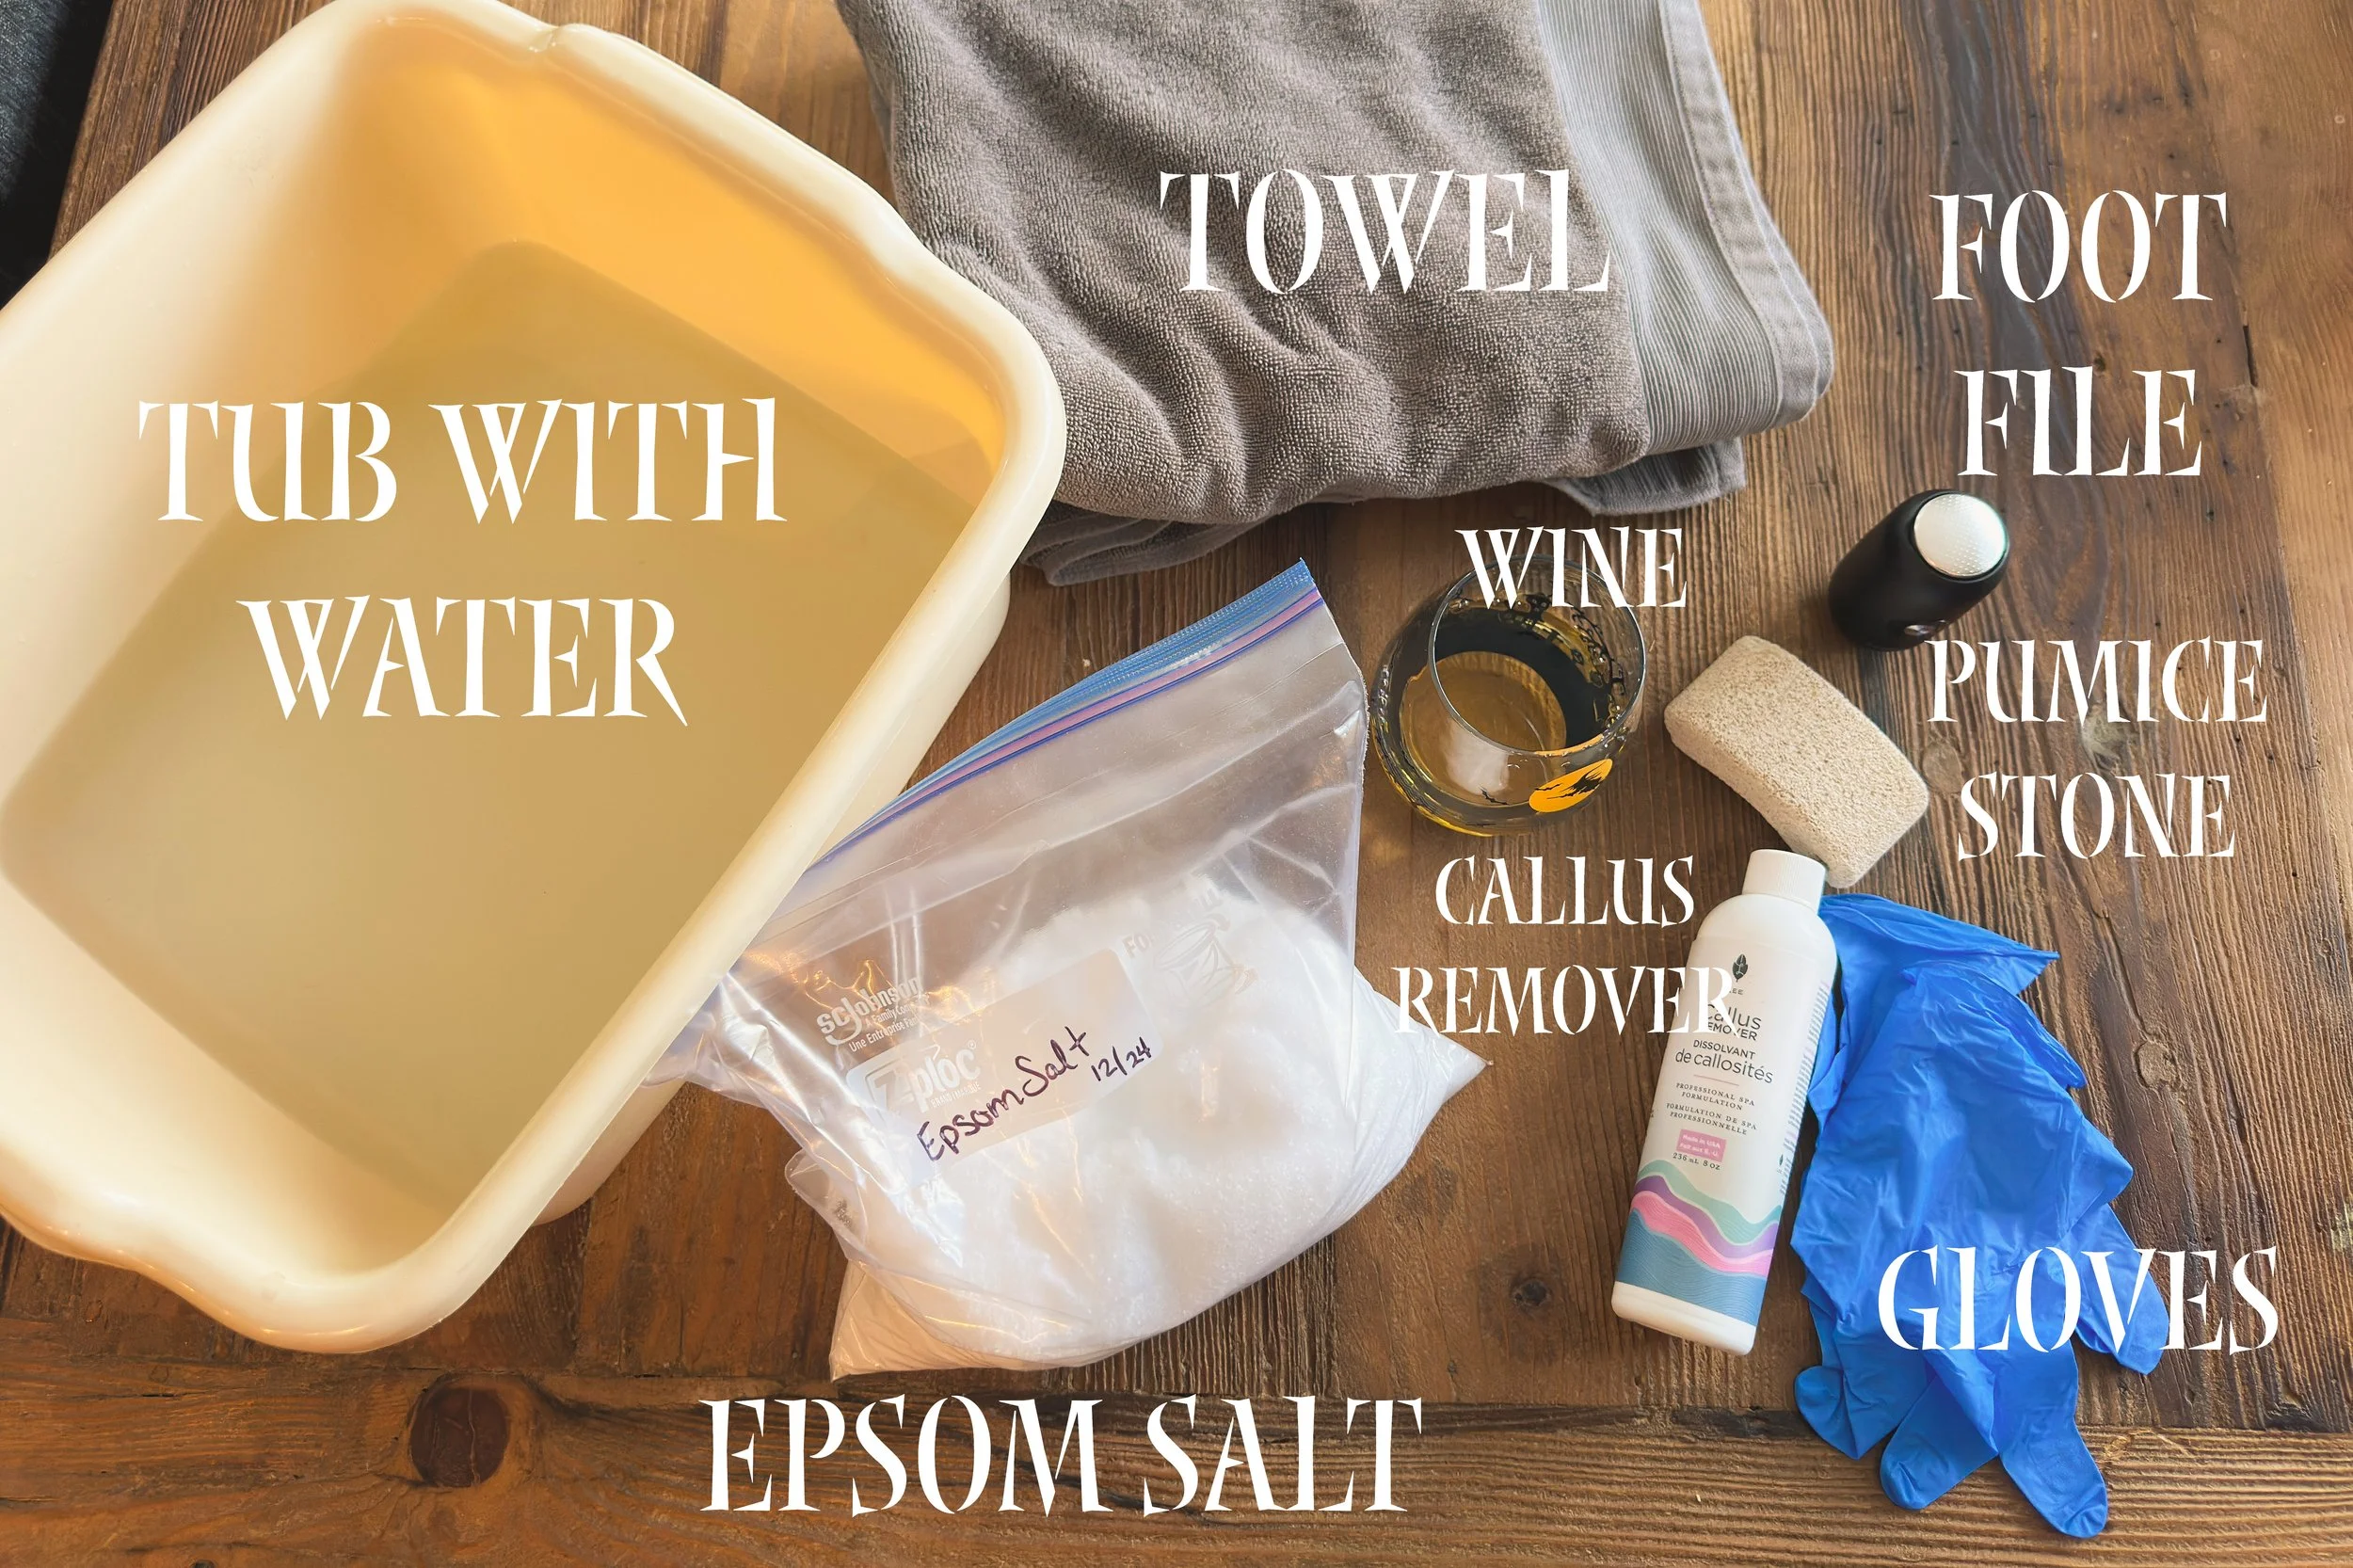
Supplies
You will need:
- A foot soaking tub (A bathtub also works, but I like to do this in my living room)
- A towel to put under the tub and to dry your feet on
- Epsom Salt - The salt is not totally necessary, but I do find it helps soften my skin a little more than just water alone.
- Callus Remover - Seriously don’t skin this step! This is the catalyst to getting that tough skin off.
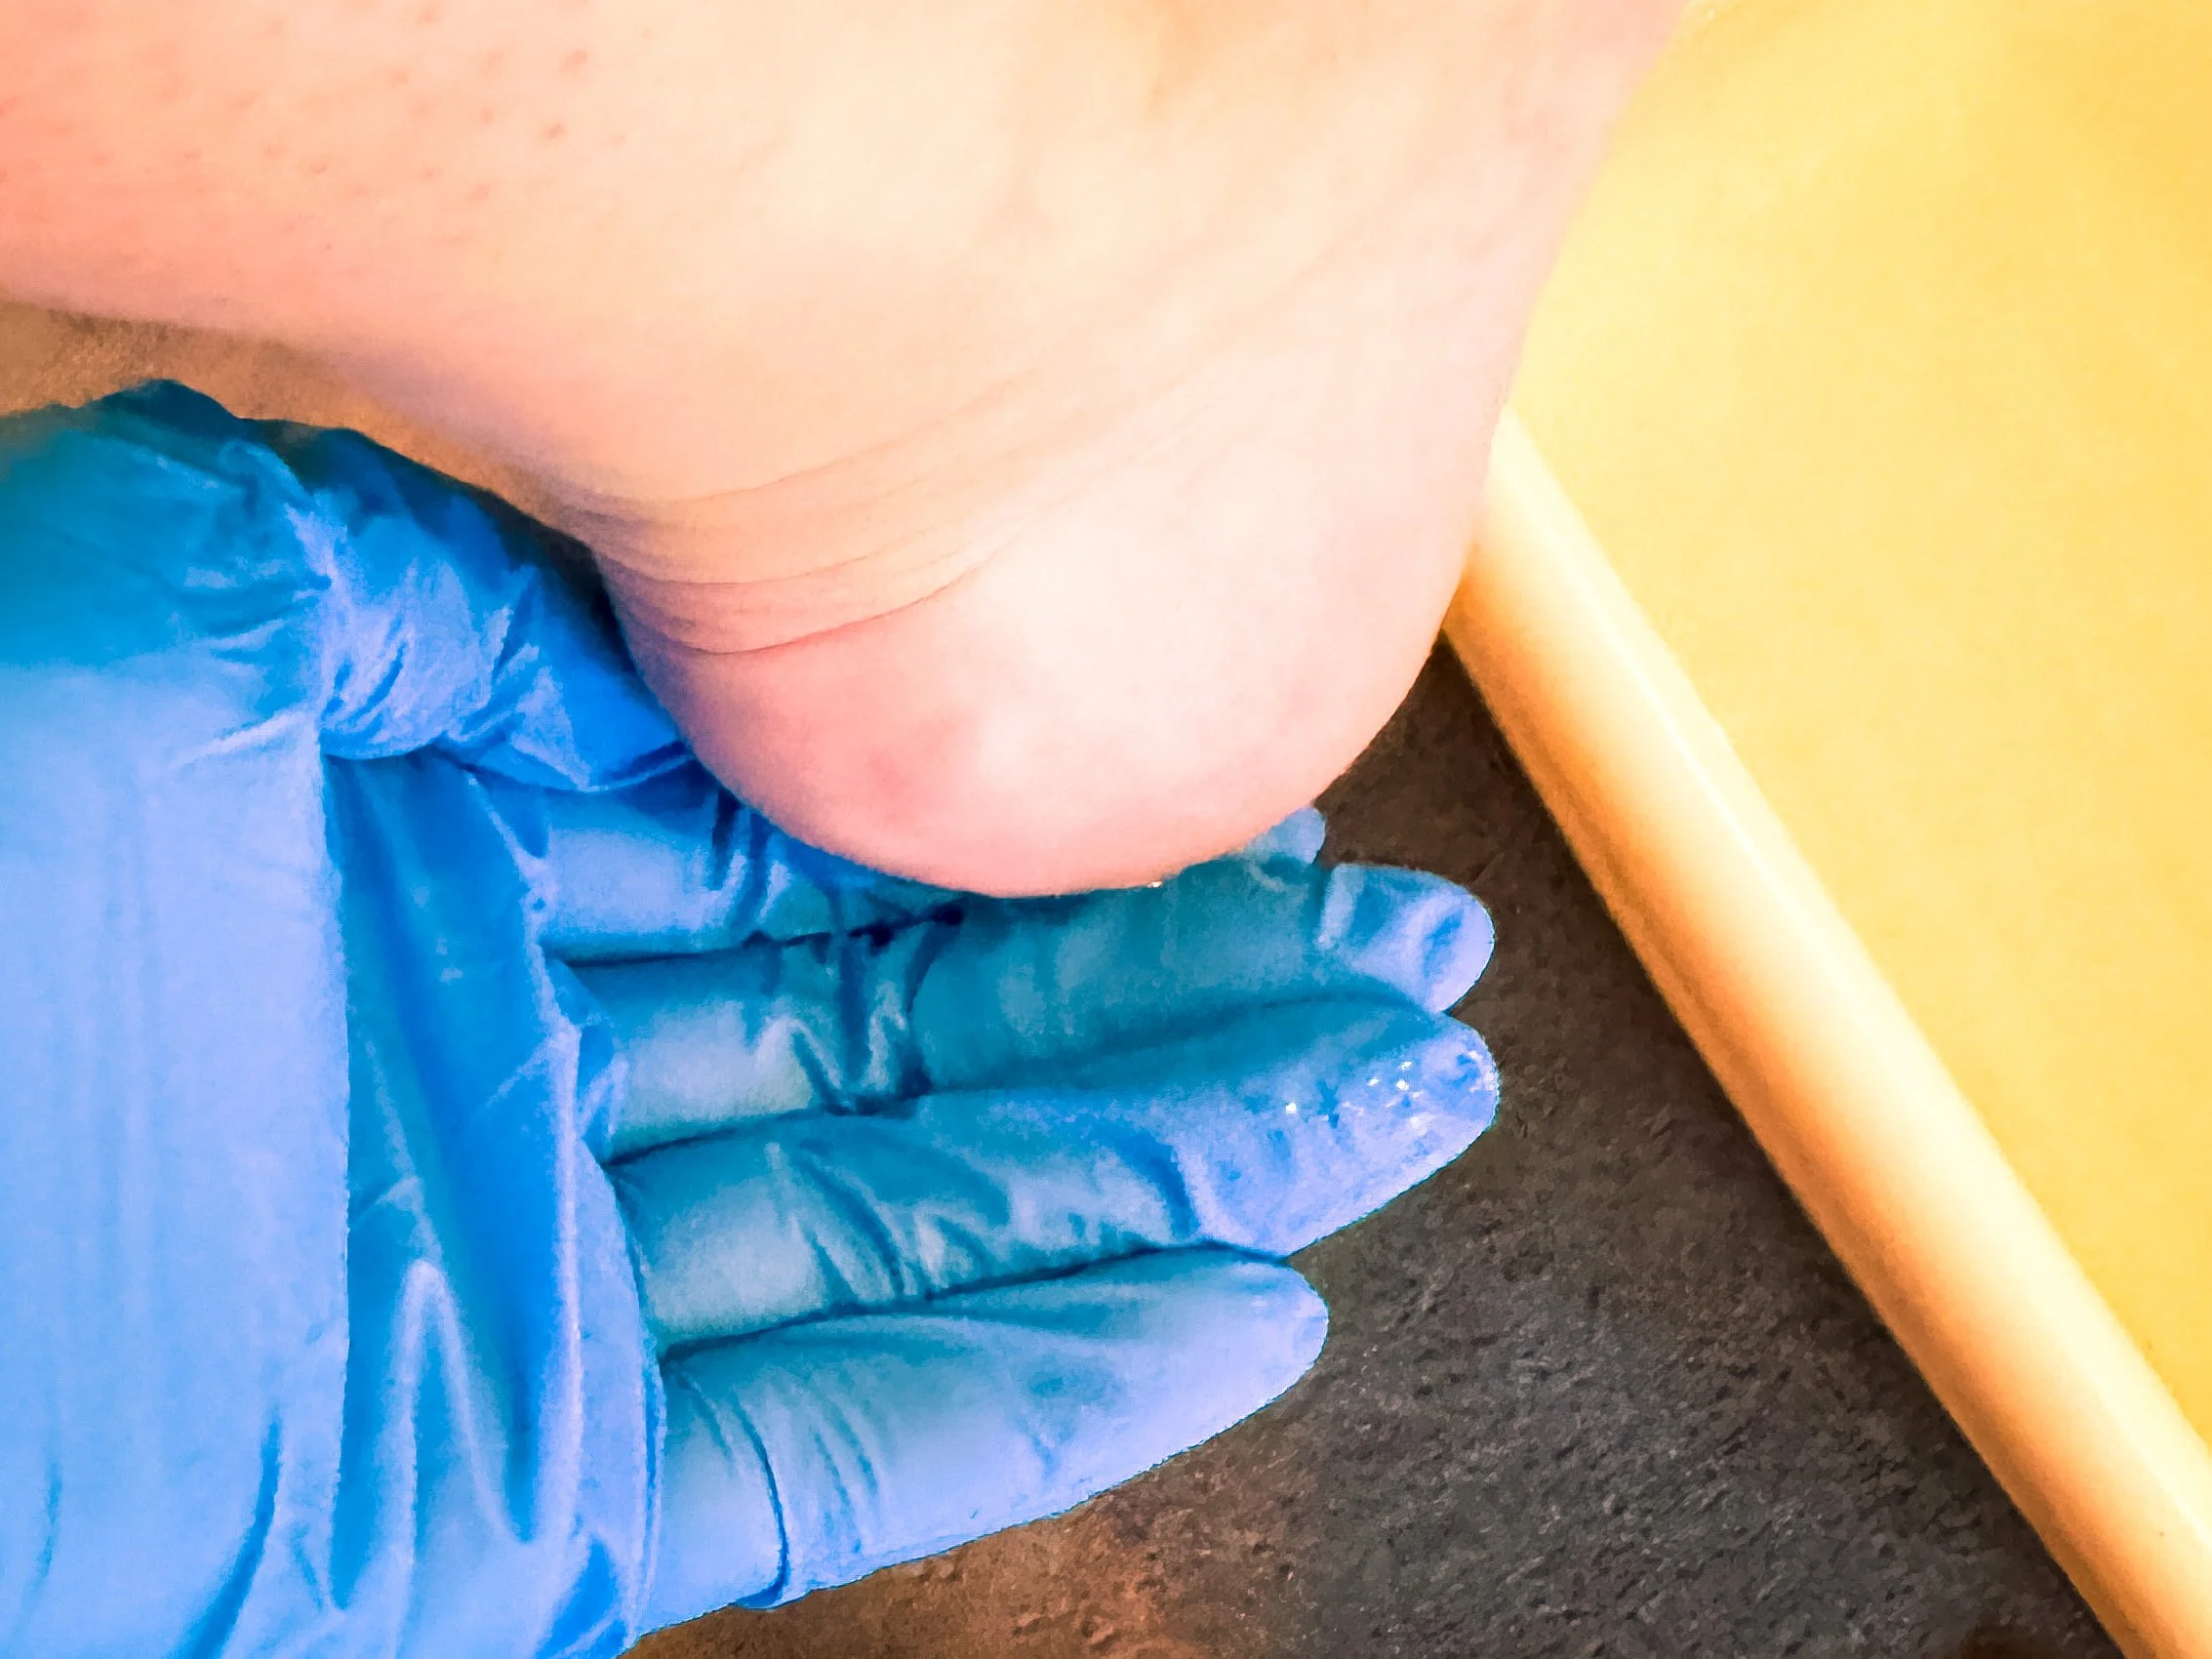
- Gloves - If you have reusable gloves, they will work. For this I prefer disposable gloves.
- Pumice Stone - Not only for the pedicure, but I use a pumice stone every day in the shower, its a must have!
- Electric Foot File - I like this not only for the finishing touches on my pedicure, but I use this a lot when to touch up my feet between pedicures.
- Wine - Ok, you don’t need this, but who doesn’t love a pedicure with a glass of wine.
Now that you have the supplies ready, let’s get started!
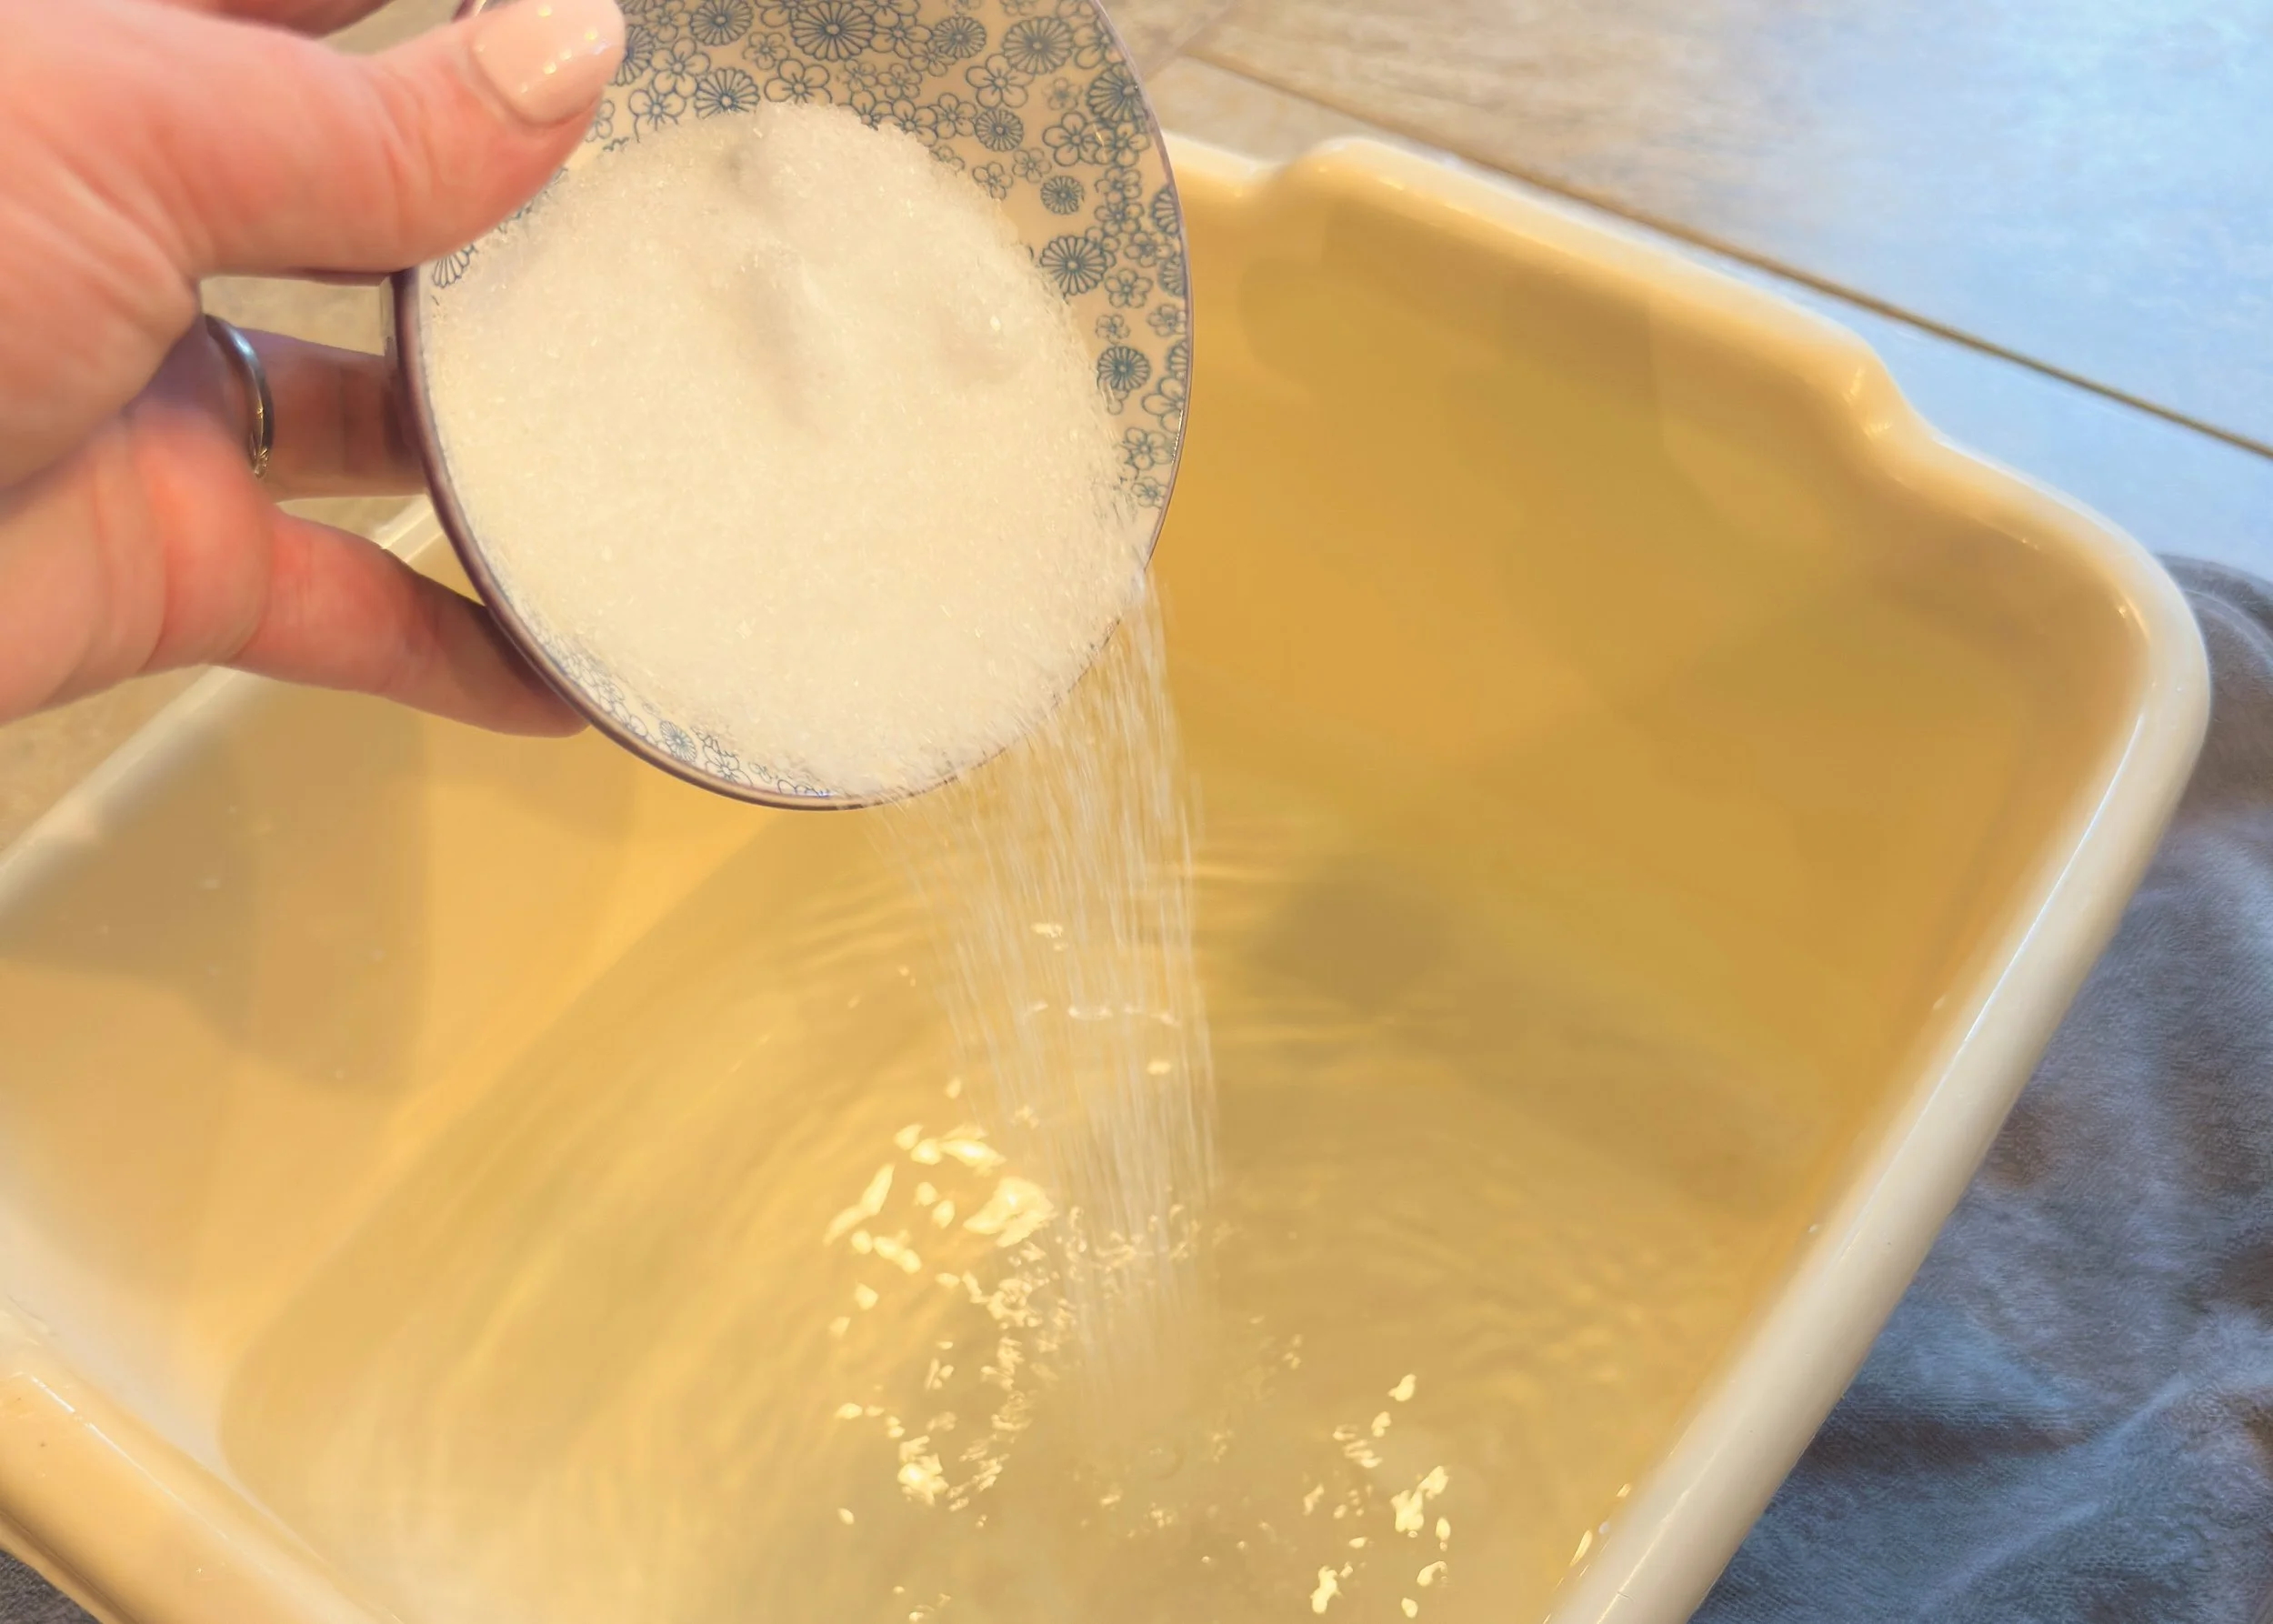
Epsom Salt can help with muscle relaxation, and also helps with skin health and exfoliation.
Step 1 - Place some water in a bucket or tub and add a healthy dose of Epsom Salt. I like to use a snack bowl for a little over a cup of salt. The water needs to be warm enough to help dissolve the Epsom Salt, but other than that, temp to your liking. Soak feet for 10-15 minutes
Step 2 - Relax, have some wine, put on a tv show, scroll social media. One of the things I love about pedicures at the salon is it’s an opportunity to relax and disconnect. This pedicure should also be a little relaxing. Treat yo self!
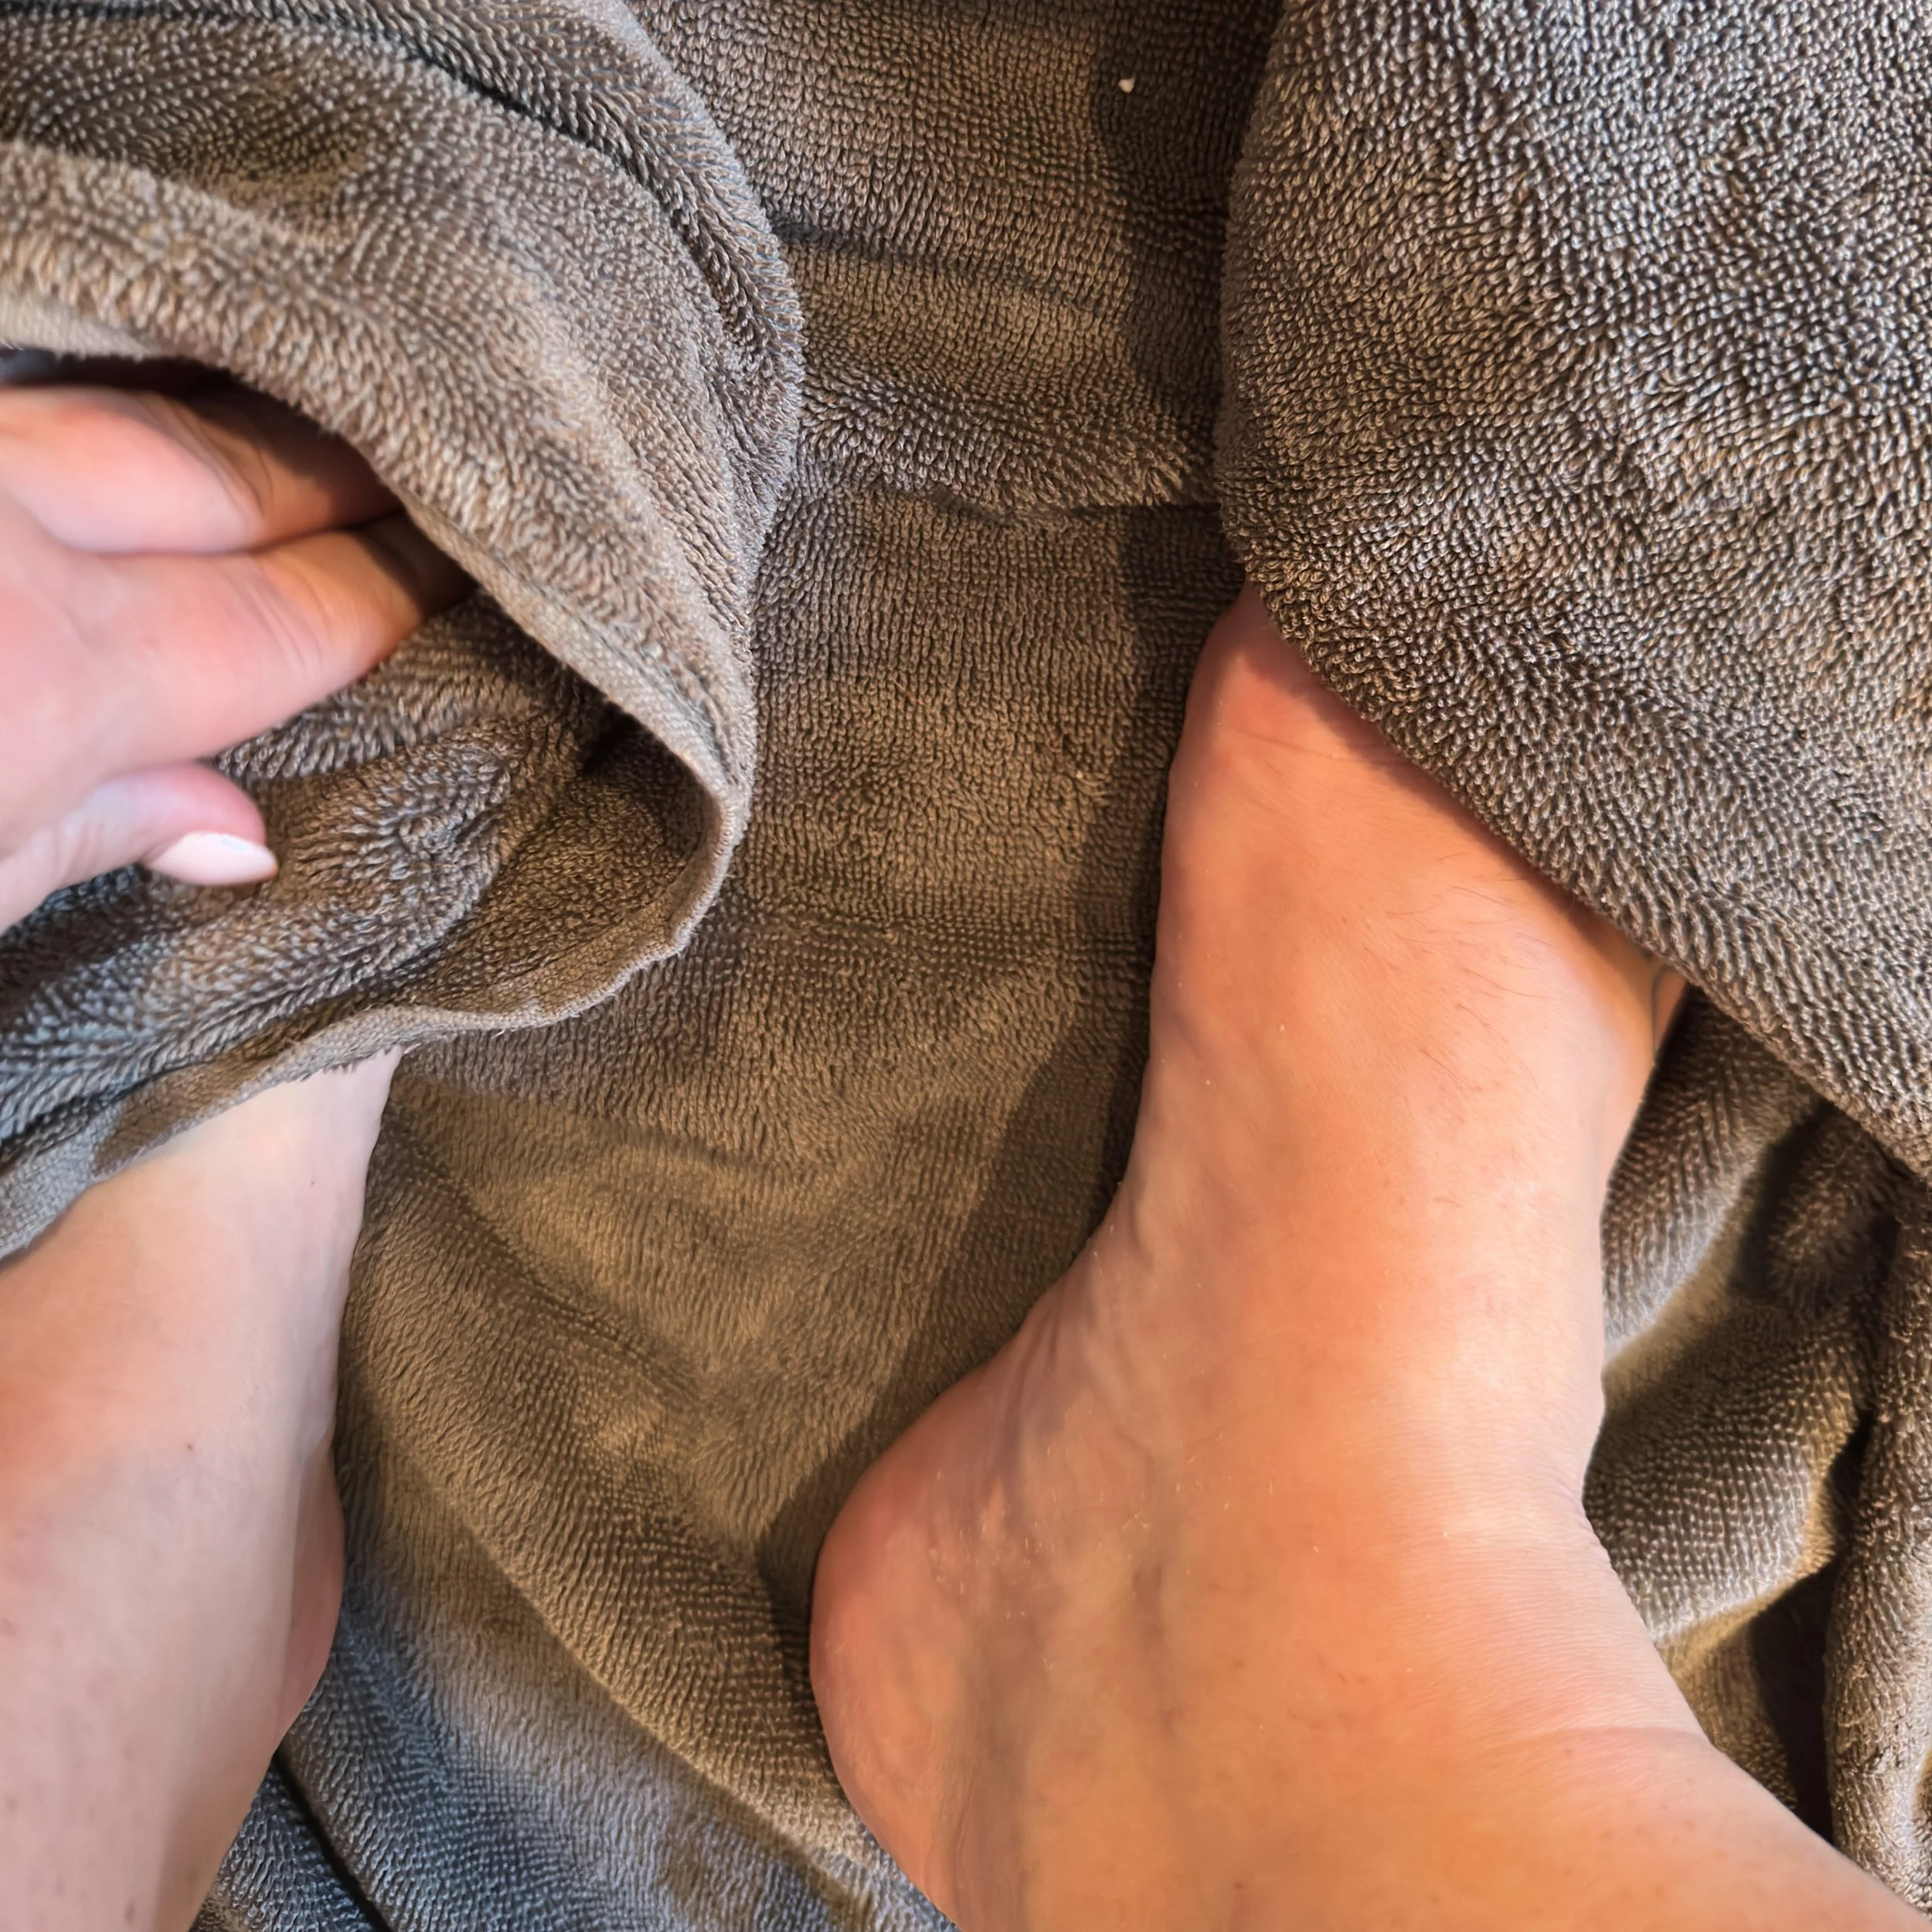
Gentle dry your feet with a towel just to get the extra water off.
Step 3 - After about 10 minutes, remove your feet from the water. Wipe off excess water from your feet. Don’t dry them, just make sure the water won’t dilute the callus remover. Using a glove, apply Callus Remover to any tough skin on your feet. Try to avoid non-callused skin as it will make your skin flake. The Callus Remover should only be on your feet for about 3-7 minutes depending on your level of callus. I recommend setting a timer for this stage so you do not go too long.
Step 4 - After the 7 minutes, rinse the callus remover off your feet and pumice stone the sh*t out of your feet! The callus remover softens the skin, now it’s time to get it off your feet. I like a curved pumice stone but some people prefer the ones with a handle. Whatever your weapon of choice, don’t rush this step. You should be seeing some skin shed off, check feet after every few scrubs to ensure you don’t damage healthy skin.
Step 5 - Wash off your feet in the water and if some tough skin remains, touch up with the pumice stone.
Step 6 - If you feel that you would benefit from a second round of Callus Remover, repeat steps 3 through 5, getting your feet as smooth as possible. I have only had to repeat these steps a couple of times when I have been unable to tend to my feet. I have had several procedures due to 2.5 years of IvF which left me unable to tend to my feet for periods of time and that would be the only time that I really needed to repeat. Seriously, this stuff is amazing.
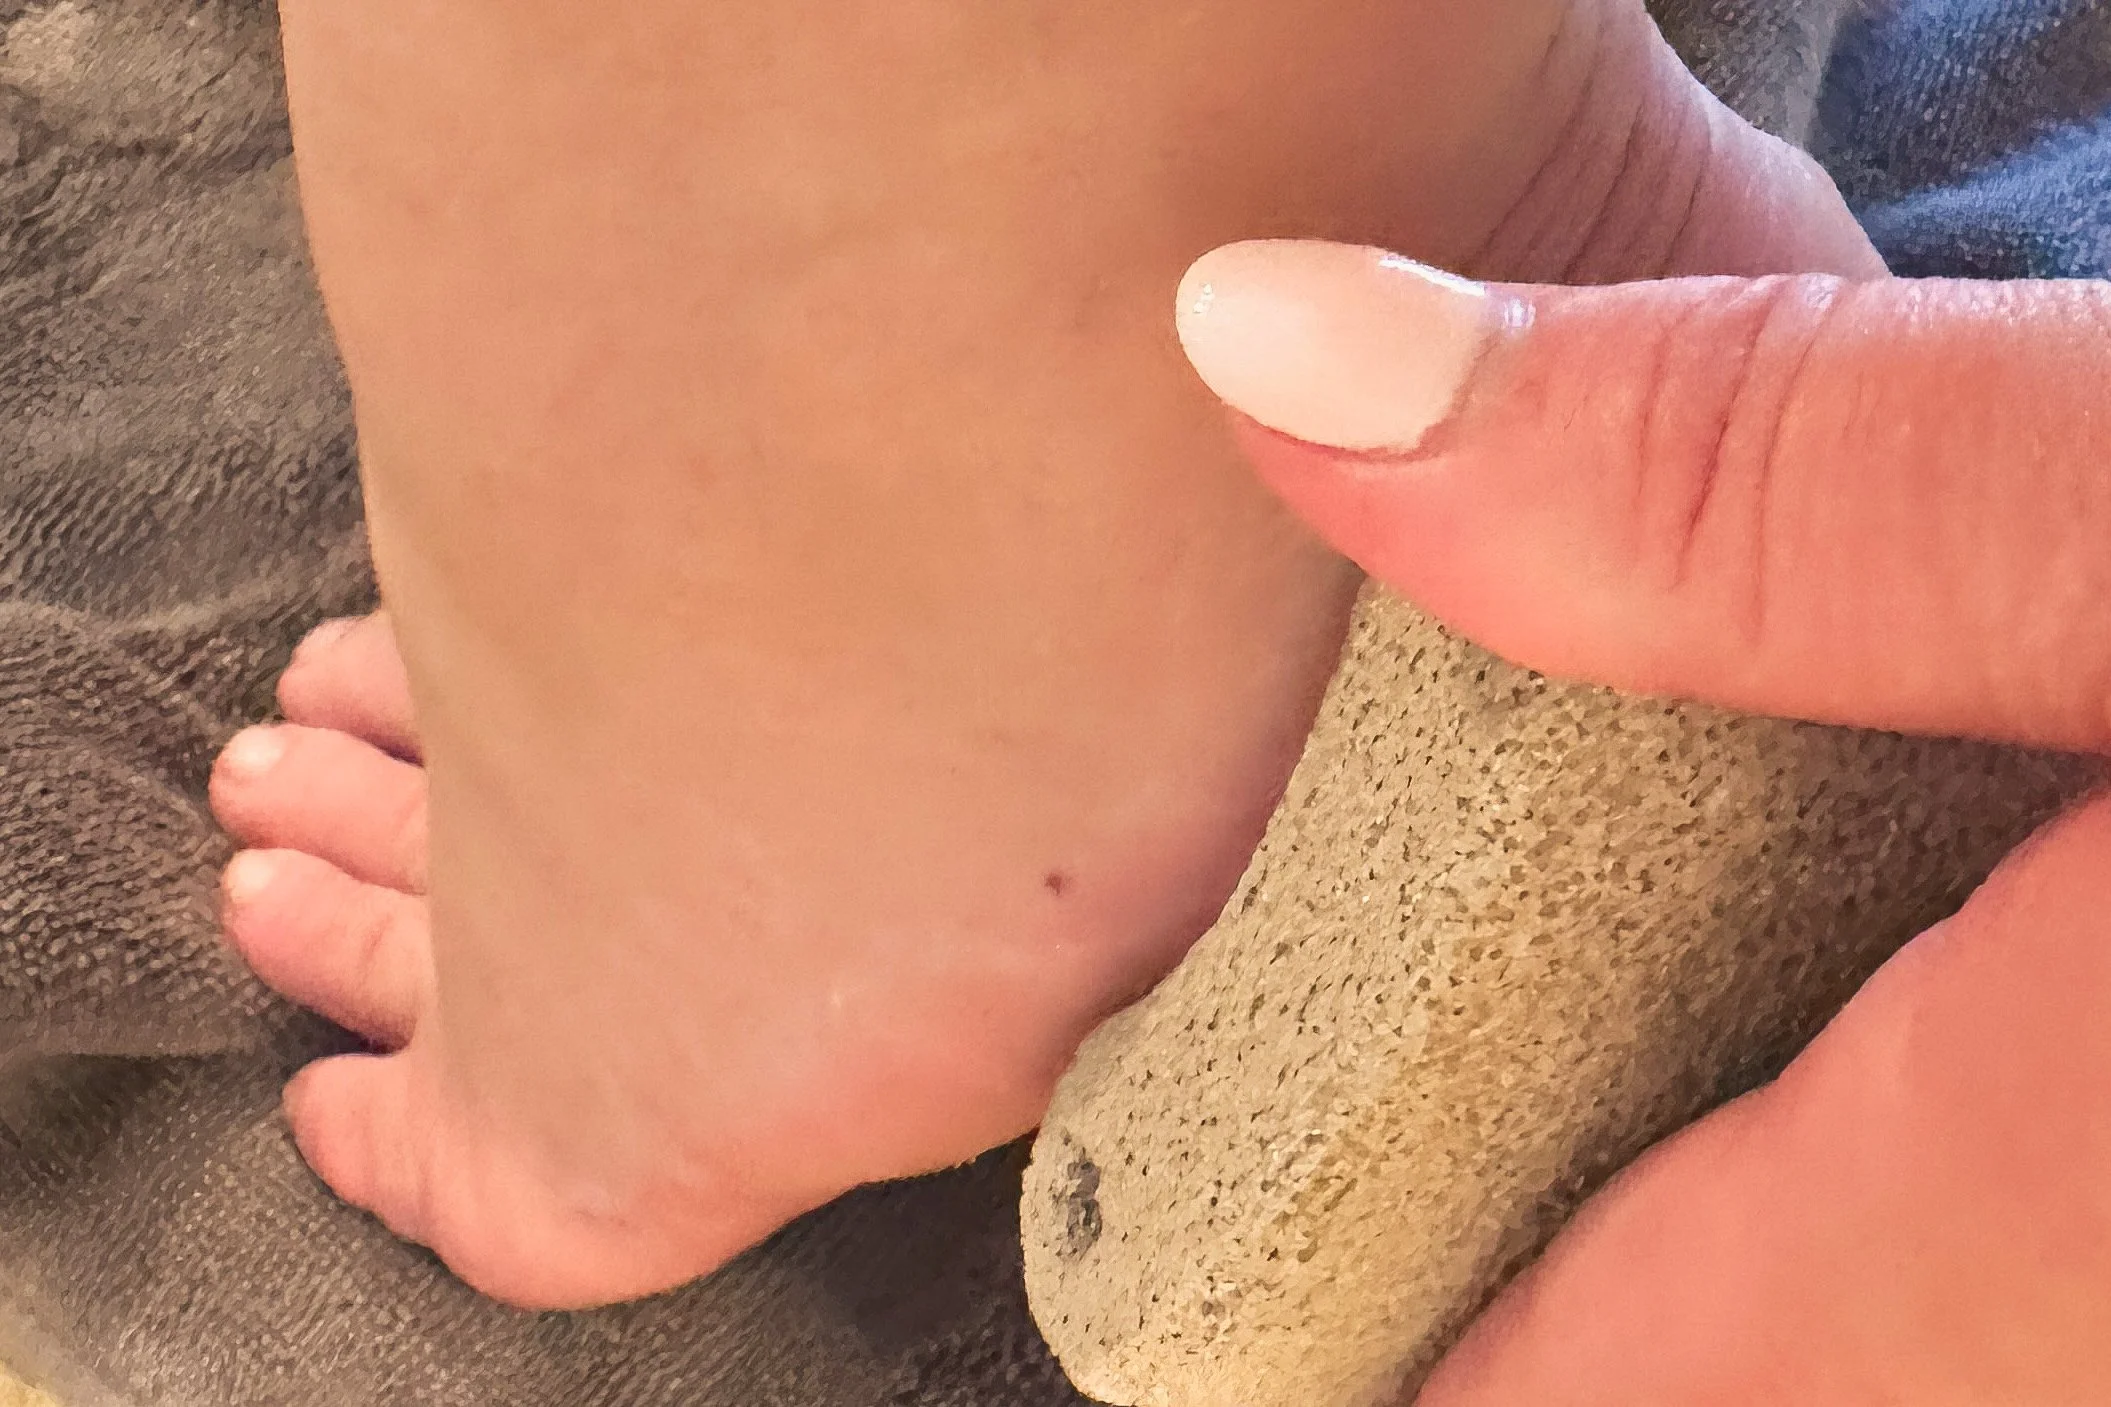
I use a pumice stone every day in the shower, but it’s also a must have for at home pedicures.
Step 7 - Once your feet feel nice and smooth, and you have cleaned off all of the excess Callus Remover and dead skin, dry them off really well. I like to take the towel rub them dry, this helps get off any extra dead skin, and then I typically let them air dry for a minute or two.
Step 8 - This is where I like to use the electric foot file. Once your feet are dry, use an electric foot file to go at the typical tough areas. The heels, the big toe, the outside edge. Just let the file do it’s thing and get anything that is left.

This electric foot file packs a punch, but also is compact and perfect for travel.
Step 9 - Ok, I didn’t add lotion in the supplies for the at home pedicure, but your feet are going to want some lotion. I pretty much only use this Cetaphil, but whatever your favorite one is, get those feet nice and moistened.
And that’s it! Depending on how dry my feet are, this pedicure can take me anywhere between 20 - 45 minutes, but its always worth it and I love the savings. I estimated that last year I spent about $1,000 on pedicures, and while I love getting a pedicure, I knew this was something that was going to save me a lot of money.
I also perform regular maintenance on my feet. I use a pumice stone every day, lotion after the shower and before bed and then occasionally use these feet masks. But I do warn you, these masks will make your feet peel, so don’t do them if you have an event that you want your feet looking great for.

Benable: Review from a Small Content Creator
So what is it? My first instinct was that it was a combination of Pinterest and LTK. I later found out that is what the company is aiming for, with a little Yelp mixed in there. Benable partners with over 35,000 brands and auto adds affiliate links to your shared recommendations. You can use it for your own content and products too, making it easy to put effort in to creating an idea list and then forgetting about it.


A girl’s social media folder in her iPhone
So what is it? My first instinct was that it was a combination of Pinterest and LTK. I later found out that is what the company is aiming for, with a little Yelp mixed in there. Benable partners with over 35,000 brands and auto adds affiliate links to your shared recommendations. You can use it for your own content and products too, making it easy to put effort in to creating an idea list and then forgetting about it.
Unlike LTK, Benable is still open to smaller content creators which I think is a huge benefit to the site as we are getting fresh ideas and not the same content we are already seeing on TikTok and Instagram. I have a little over 26,000 followers on Tiktok and I have been denied by LTK twice in full disclosure.
I’m not bitter about it, I still very much so enjoy the site. However I do sometimes feel like there is a lack of relatability. As content creators grow, they are introduced to new, often more expensive brands, and there is a natural development of not being as relatable. I don’t think this is a bad thing necessarily. It is almost like watching the American dream in real time. However, I do find myself favoring smaller creators currently and Benable is a great site for that.

One of my lists that needs a little more work before it gets optimized on the site.
What I like about it:
Easy to earn commissions - While I have been exploring the site, I haven’t made a ton of lists. I only have three published lists currently, but I have made over $10 in commissions. While this may not seem like a huge amount, I have put in far more work on other sites and reaped no reward. So I am certainly seeing Benable as a more viable option for future efforts.
List Optimization - When you put your effort into creating a list and the website sees it as creative, well thought through and beneficial they will optimize the list and push it higher on the algorithm. This is one of my favorite features because I feel like you are getting more quality content on the discover page and that your lists wont just be shouting into the void.
Draft lists - I am not a fan of drafts because I tend to start them, forget them and then get mad at myself for forgetting them. However, Benable makes this easier because when you go to your profile the draft lists are there and visible. Not locked away in some folder. It is a constant reminder when I log on to the app that I have work to do, and I know I am not going to forget to finish it.
Easy to use - Both the app and the desktop version are easy to use and I don’t find myself getting frustrated trying to create content. I do a lot from my phone, but I also love being able to sit down at my desk and knock out a lot of work quickly on my computer. So far I think this is one of the easier social media sites to have that option. Additionally, While sites like Pinterest have pins and then you could click through and see someones board, this shows your a collage of the board and then you can click through to see the link, which I think allows you to put together more holistic idea board.

This is a screen shot of my Sierra Foothills Travel Guide in the Grass Valley Section. I like that I can make multiple sections in one list so if someone is deciding where to go for the day they can look at Grass Valley or Folsom (or more once I get them up there) and decide what they want to do.
While I am a big fan of the app currently, I also do recognize that it is a baby app and there will be growing pains.
A few things that I am interested to see what happens with them are:
Content Creator heavy - The Benable team has been pushing for content creators and referrals from content creators, which I think is a good thing, but I have noticed when on the Discover Page, that it can come off as a little too perfectly curated and I want a little chaos. That might just be me though.
Would love to see - More blogs, travel ideas and intangibles. I know this is actually something the team at Benable has been aiming for, as they encouraged me to post more experience type posts, but I just don’t think the site has the right balance quite yet. I feel like its coming though and as more people join the site, the balance will happen naturally.
Overall, the Benable app was worth the download. I know thats what we all worry about. I already have all of these other apps, do I really need this one. A few months in and I have to say, I enjoy it. I think its a great addition to my social media both as a small content creator who has made a little money on it, and as a social media user who enjoys a little couch rot with my phone in my hand.

As you can see in the above photo, I have one list that is optimized, one that is currently hidden as I have not posted it yet and one that is near optimization.

You don’t want to open gifts at your baby shower? Think about these three options instead.
Whether that is a bridal shower, baby shower or some other event, people are moving away from the tedium of opening gifts in front of everyone. However, many people find themselves torn between what they want and what the guests want, especially guests of prior generations.

Baby shower gifts! YAY
I think the new norm is to not open gifts at your event. Whether that is a bridal shower, baby shower or some other event, people are moving away from the tedium of opening gifts in front of everyone. However, many people find themselves torn between what they want (i.e. not being stuck sitting in front of all of your guests 8 months pregnant in an uncomfortable chair while… Sorry I got distracted) and what your guests want, especially guests of prior generations.
There are three options that I think offer a nice compromise. These options make sure that the guest who want to watch you open gifts get that special moment, while not requiring you to spend the entire party asking for scissors to cut ribbon.

Display gifts are gifts that are not wrapped so other guests can admire them.
Display Gifts - This is nothing new, lots of people have been doing this as a compromise for years. Essentially, the gifts come in more of a display or unwrapped way so other guests can see them. I think for baby shower gifts especially, this is an excellent idea. I personally LOVE unwrapping gifts so this wasn’t my thing, instead at my baby shower, I had everyone put the gifts in the nursery to save me the repeated “show me the nursery” during the party, but I didn’t specify to wrap the gifts or not but I did tell people that we wouldn’t be opening them at the shower. I would say about half ended up doing more of a display gift presentation instead of wrapping.
Receiving “Hour” - I feel like this should be a half hour, but you know your guests best. The idea behind this option is that you set up a greeting area, basically you in a comfy chair, and accept gifts for a specific amount of time before the party. This allows you to have a quaint moment with Grandma or dear Aunt Carol, but for those guests that don’t mind you opening gifts privately, they arrive a little later and you get to enjoy time with all guests.
Post Party Opening - This is the other end of the receiving hour. A friend of mine did this and I thought it was GENIUS! Essentially she had two gift tables, one marked for gift opening, and one marked for private opening. I think the signs said “Open me at the party” and the other said “Open me later” or something like that. About half an hour before she was going to open gifts they made a little speech, thanked everyone for coming. She then made her way around the party and said her goodbyes to people who were leaving. I had put my gift on the Open me later table, but I still stayed to watch her open the gifts. It only took about fifteen, maybe twenty minutes. It was much more intimate than if all 50 guests were there during the gift opening. I didn’t do this at my baby shower, but I feel like this would have been a great compromise because several guests did ask me to open their gifts after the party had all but wrapped up.
I am personally of the camp that you do not have to open gifts at your party if you are going to feel uncomfortable or heck, even if you don’t want to. I do enjoy watching people open the gift I got them but I think there are other ways to go about it. My husband and I ended up sitting in my daughters nursery opening gifts and really getting the time to appreciate each one. It took more than an hour and I really appreciated that I didn’t feel rushed or like I wasn’t getting to enjoy each gift.

I also think, if you are having a single gender party, sometimes it is nice for your husband to get to be there when you are opening gifts. Bridal shower gifts are often for the couple and baby shower gifts are mostly for the baby, so why is it just the wife/mom who gets to revel in the excitement of the gift the loved ones gave?
Just remember, at the end of the day, it is your party and you can do it the way you want to.

Hot Sleeper? These 3 items help me get better sleep!
In the ten years since I moved here, I have probably spent 8.5 years complaining about the heat. I hate it. If you ask me to do something during the summer months that doesn’t include water, forget about it.
This post contains affiliate links. As an Amazon Associate, I earn from qualifying purchases.
Since I was a kid, I have not been able to sleep when it is too hot. I grew up in the high desert and most of summer was desert standard. Hot days, but cooler nights. We would get a week or two of hot, stagnant misery and unfortunately the standard was to not have Air Conditioning. Don’t get me wrong, it kind of makes sense to not have air conditioning there, but still.
I grew up moved to Oregon for college, then back to my beautiful high desert, and then when I was 26 I met my now husband and moved to the Western side of the Sierra Foothills. Yikes, was I not prepared for how hot it was here.

In the ten years since I moved here, I have probably spent 8.5 years complaining about the heat. I hate it. If you ask me to do something during the summer months that doesn’t include water, forget about it.
While air conditioning is standard here, the cost of electricity is also pretty high. So we like to sleep with our windows open as often as possible. But even when it cools down to say, 70 degrees Fahrenheit, I still have trouble sleeping here because the heat is semi-moist and I just can never seem to cool down during the summer.
Two years ago when I was mid-IvF we decided to invest in some products that claim to be cooling to help you sleep better. We found some flops, but where I landed the most comfortable was with these three items.

Bamboo Viscose Sheet Set - Bamboo is cooling because if its breathability and moisture-wicking properties… according to every bamboo product I own. I love bamboo now that I live in a hot
semi-moist location. I have bought a couple of less-expensive bamboo sets in the past, but I am really glad I decided to splurge a little on these. We have had them for about a year and I recommend them frequently.
Bedsure Cooling Cotton Waffle King Size Blanket - This is for my friends that need weight on them to sleep, but also don’t like to be too hot. During the summer this is all we use on top of our sheets. It’s heavy enough to feel like you had a blanket on you, but it’s breathable has made a world of difference in my sleep.
Capser Cooling Mattress - This mattress has a 4.4 star rating with almost 6,000 reviews on Amazon and let me tell you, they are not wrong. My husband and I had a cheap memory foam mattress for a long time and it was fine as far as comfort but I would lay down and immediately heat up because it wasn’t breathable. What’s underneath you is just as important as what is on top of you. If you aren’t currently in the market for a new mattress, I recommend this mattress topper.
Sleep is so vital to our health and happiness. For so long, I just felt like you bought a mattress and sheets and they are all the same. That definitely isn’t true, and for hot sleepers, it can be the difference between a night of tossing and turning, and waking up feeling rested and happy!
Cutesy-Spooky Baby Shower
My baby shower theme, officially, was Bats and Bubbles, but I leaned heavily into the bats. The shower was held mid-october so I wanted it to be spooky themed, but also something that seemed suitable for, well, a baby.
This post contains affiliate links. As an Amazon Associate, I earn from qualifying purchases.

Ok, baby shower, birthday party, Halloween party. It works for all of them.
My baby shower theme, officially, was Bats and Bubbles, but I leaned heavily into the bats. The shower was held mid-october so I wanted it to be spooky themed, but also something that seemed suitable for, well, a baby.
I designed the invitations myself, and tried to capture the essences of a cutesy-spooky theme through all the decor.

First things first was the BABY sign. I had this picture in my head of these letters with some small white balloons and bats flying over them. I used spray adhesive to hold the balloons in place then to add the felt bats. I had bats that I had previously made for halloween decor, but you can buy packs of them like these (highly recommend)!
I am also the queen of photo booths, I need them, I want them, nothing gets me hopped up quite like a good photo booth.
For the shower I decided to do a circular back drop which I have never done before. The frame I purchased is no longer together, but this one is very similar.
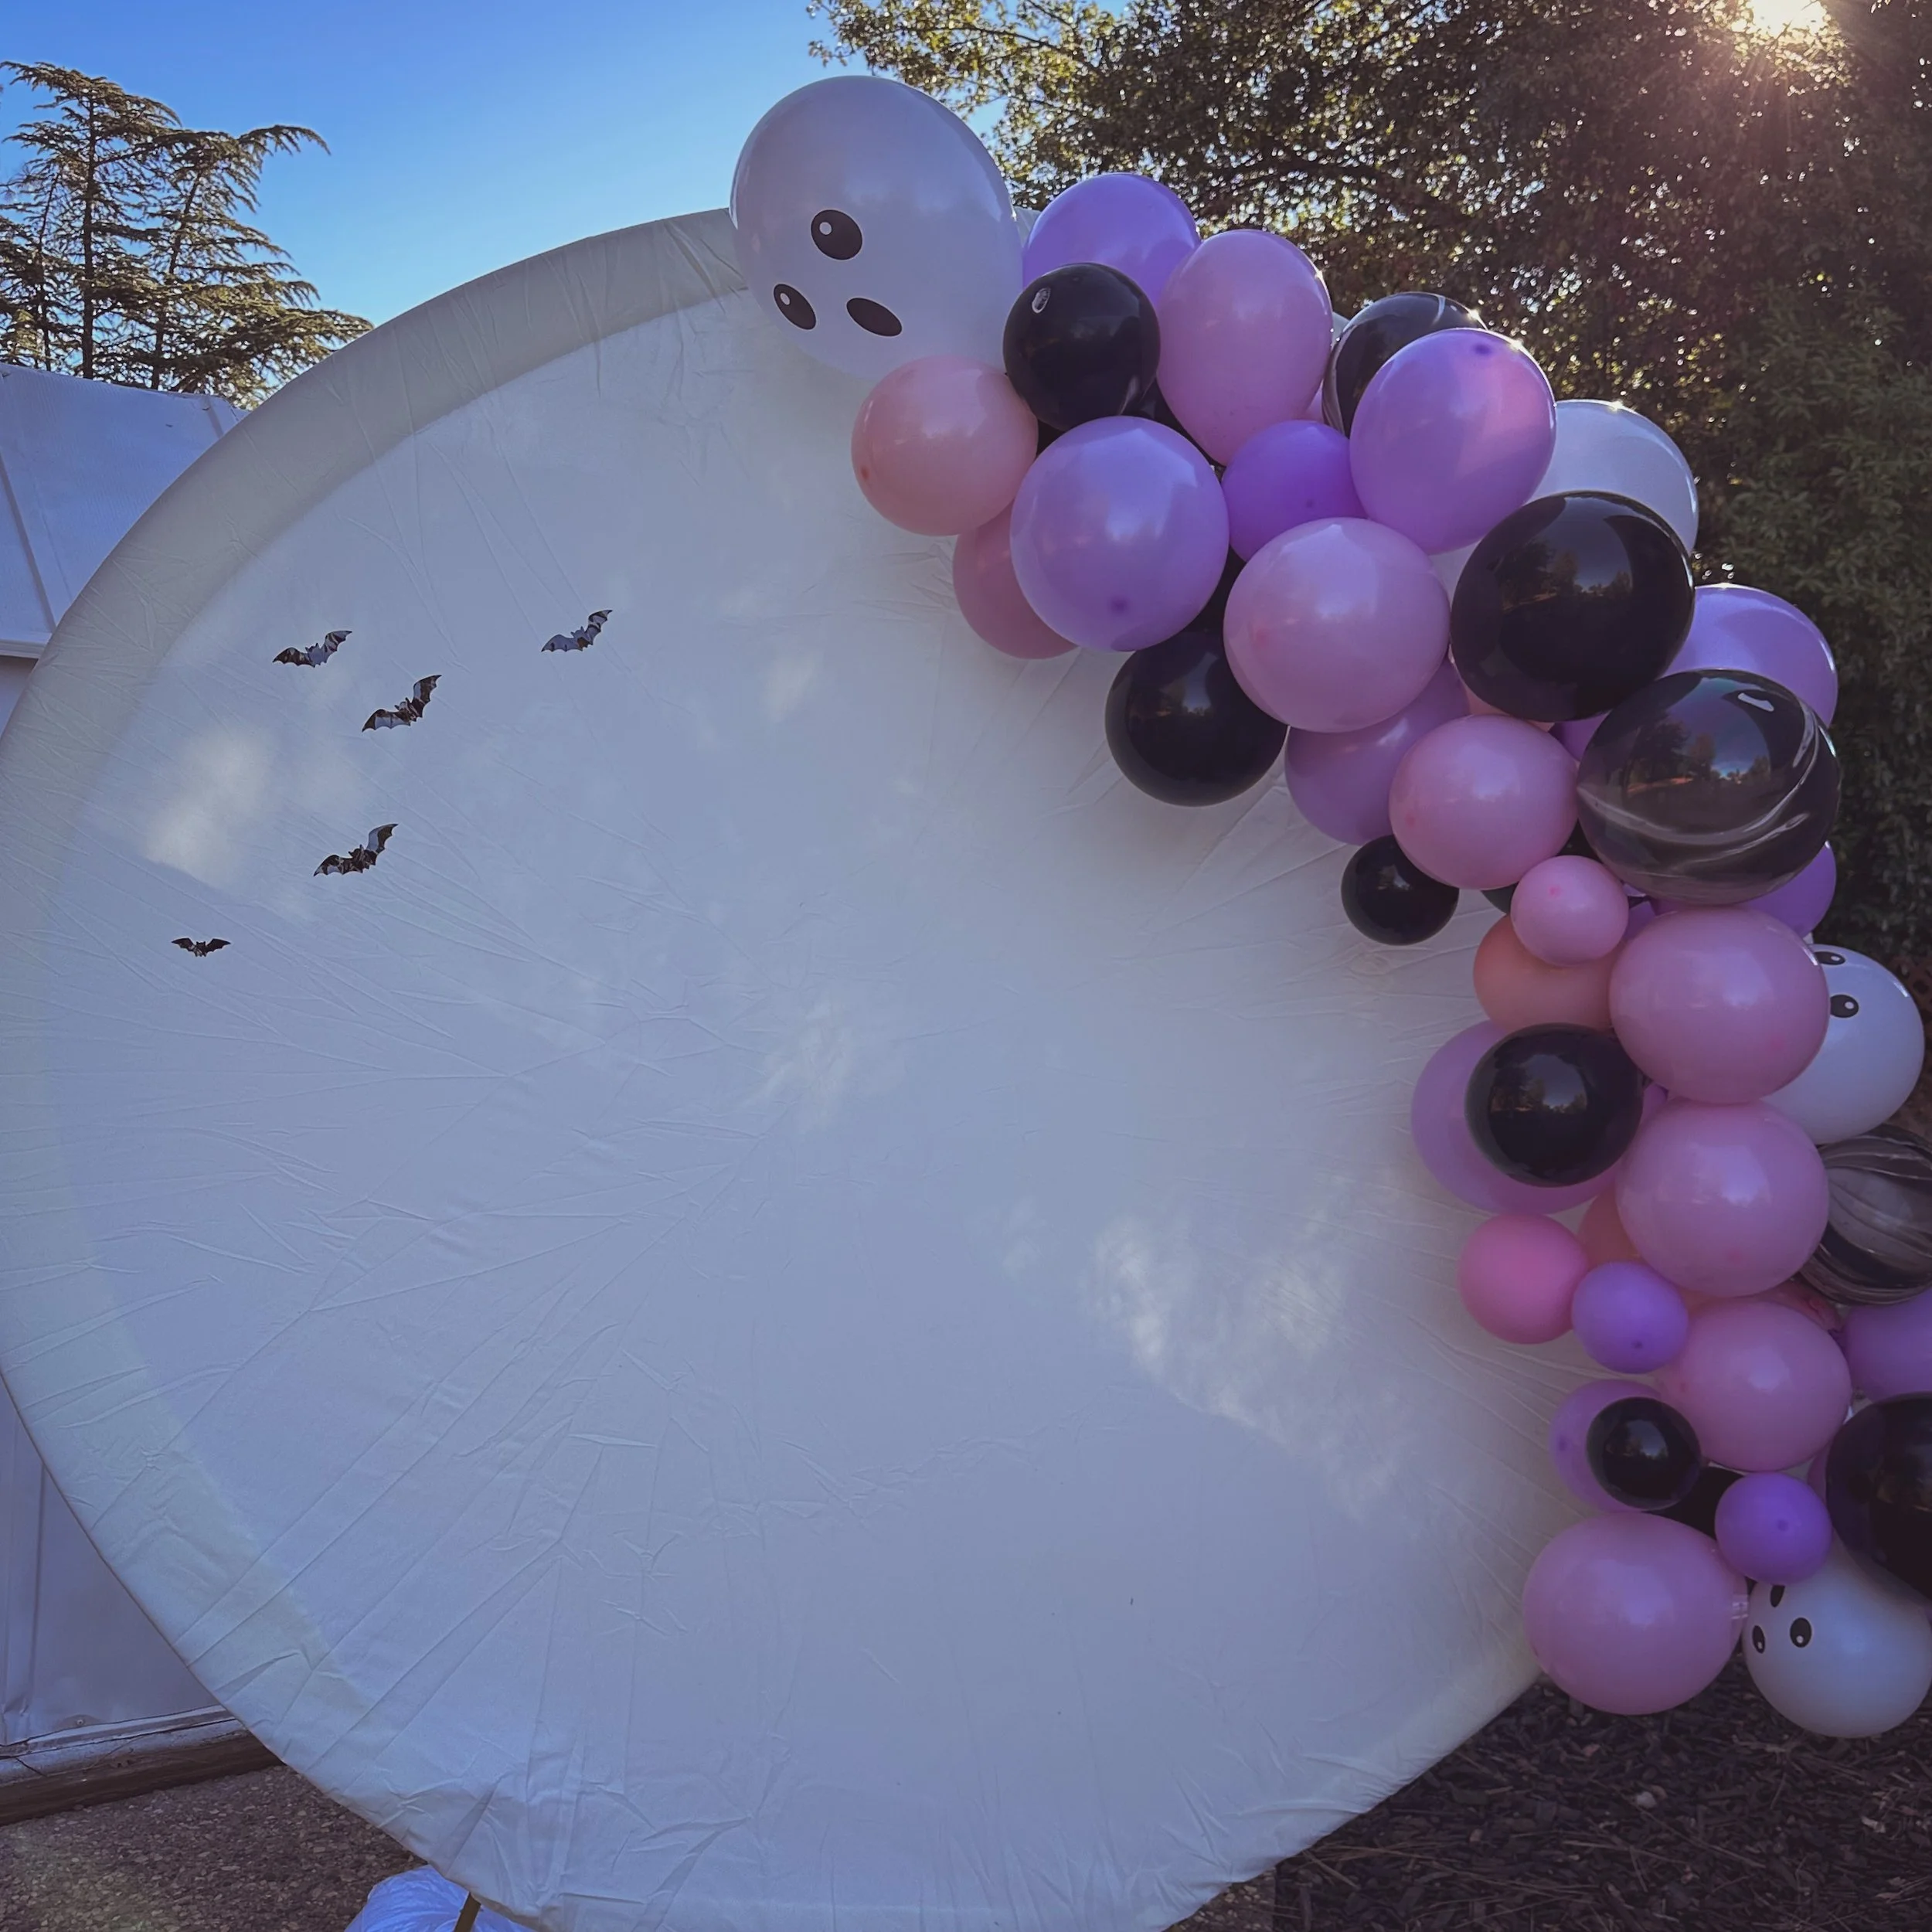
Then we added a balloon arch. Our party was centered in the backyard and it was windy that day which led to some of the balloons popping, but the arch was so cute when it was first installed by my amazing sister.
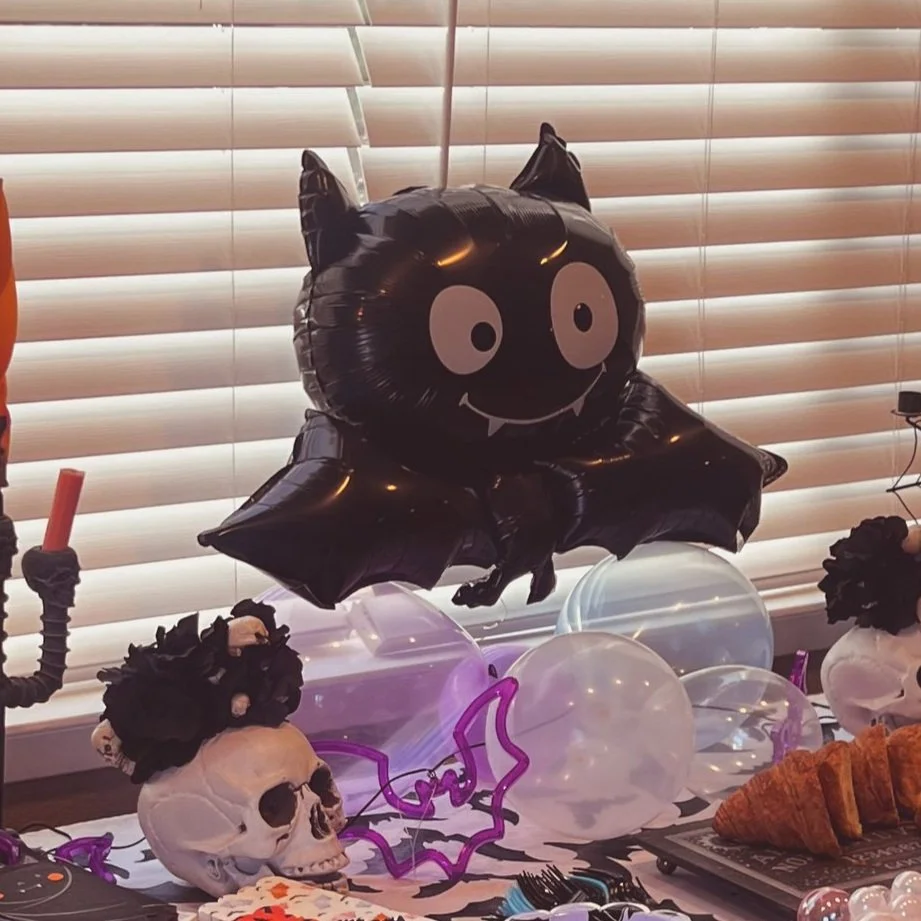
But my FAVORITE decor? These bat balloons. I ordered way too many of them so they will be a staple in my home for a while. We put them in the pool and using weights so they wouldn’t float around too much, I should have made the pool a giant bath tub and to this day I regret not thinking of that before the party.
Some other items I got for decor are:
- Bat Table Cloth - Definitely open this and steam it before the party. This would be an easy early prep for the party
- Bubble decor to put on the cake - I ended up ordering a white cake and decorated it myself (I didn’t want to chance that a baker wouldn’t understand my vision)
- 24” Bubble Balloons - To be honest, I love these for every party. They are large so I recommend renting a helium tank from a party supply store. Those tanks you can buy at aren’t big enough.
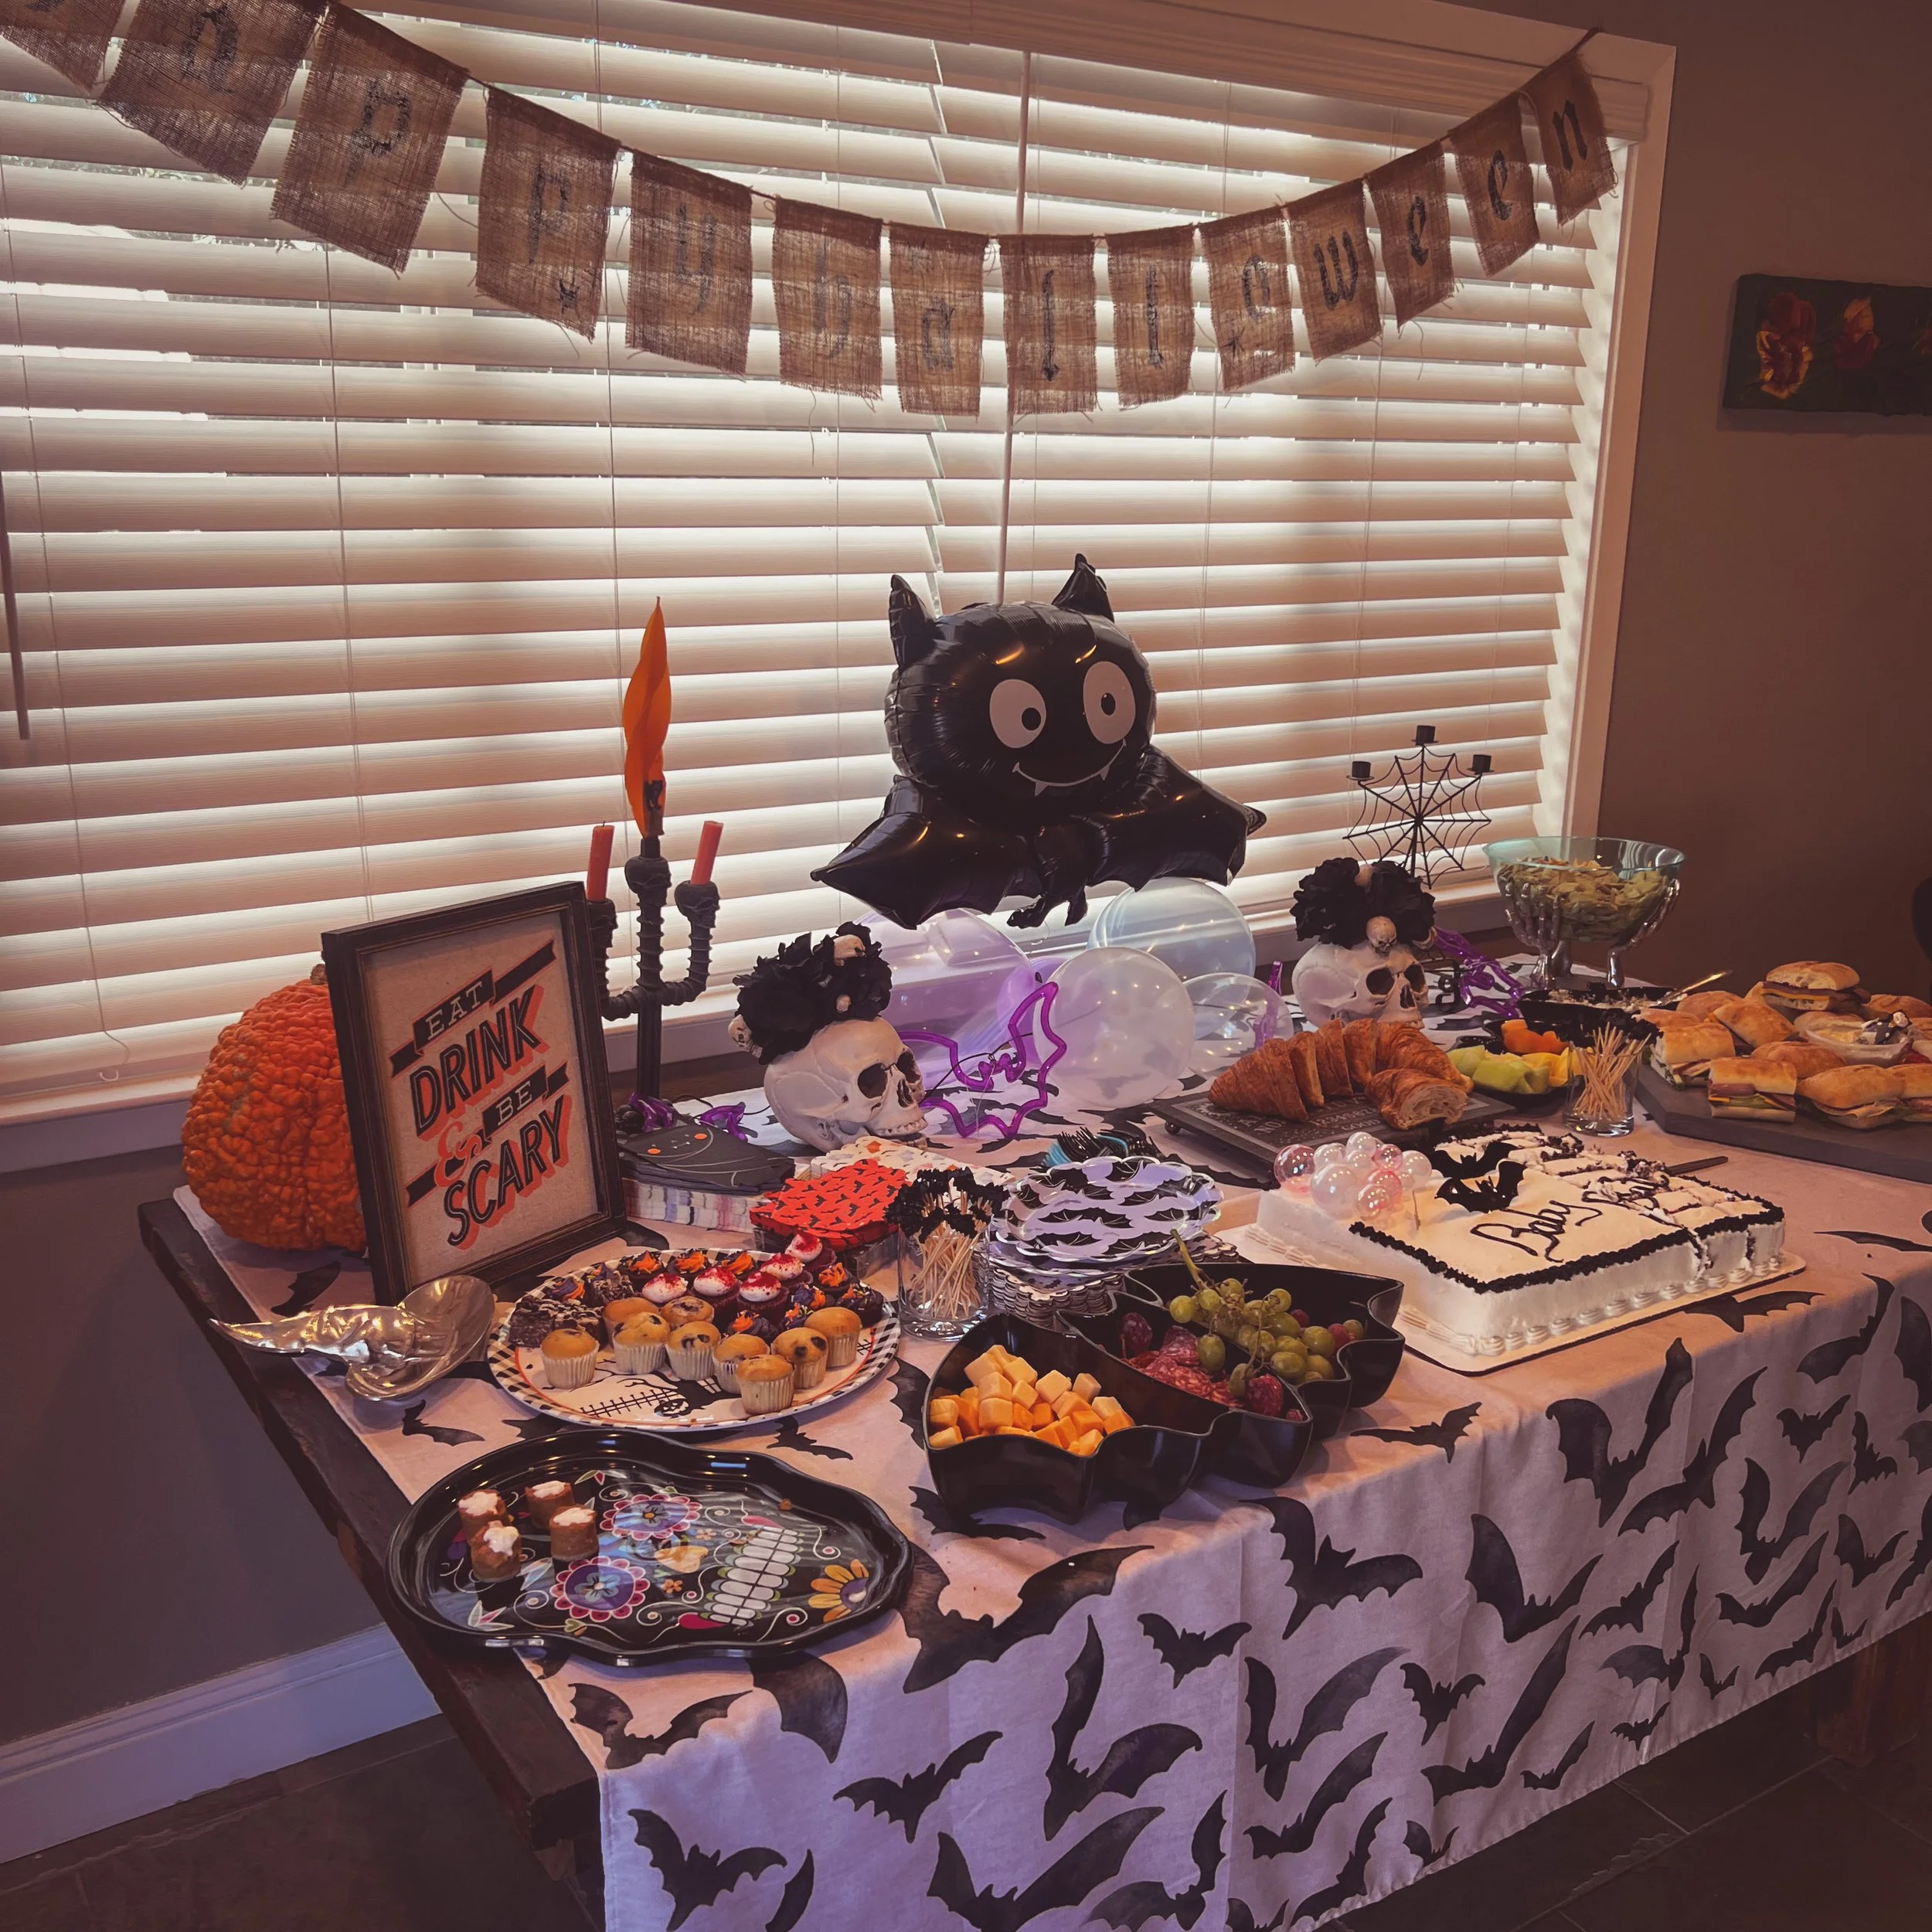
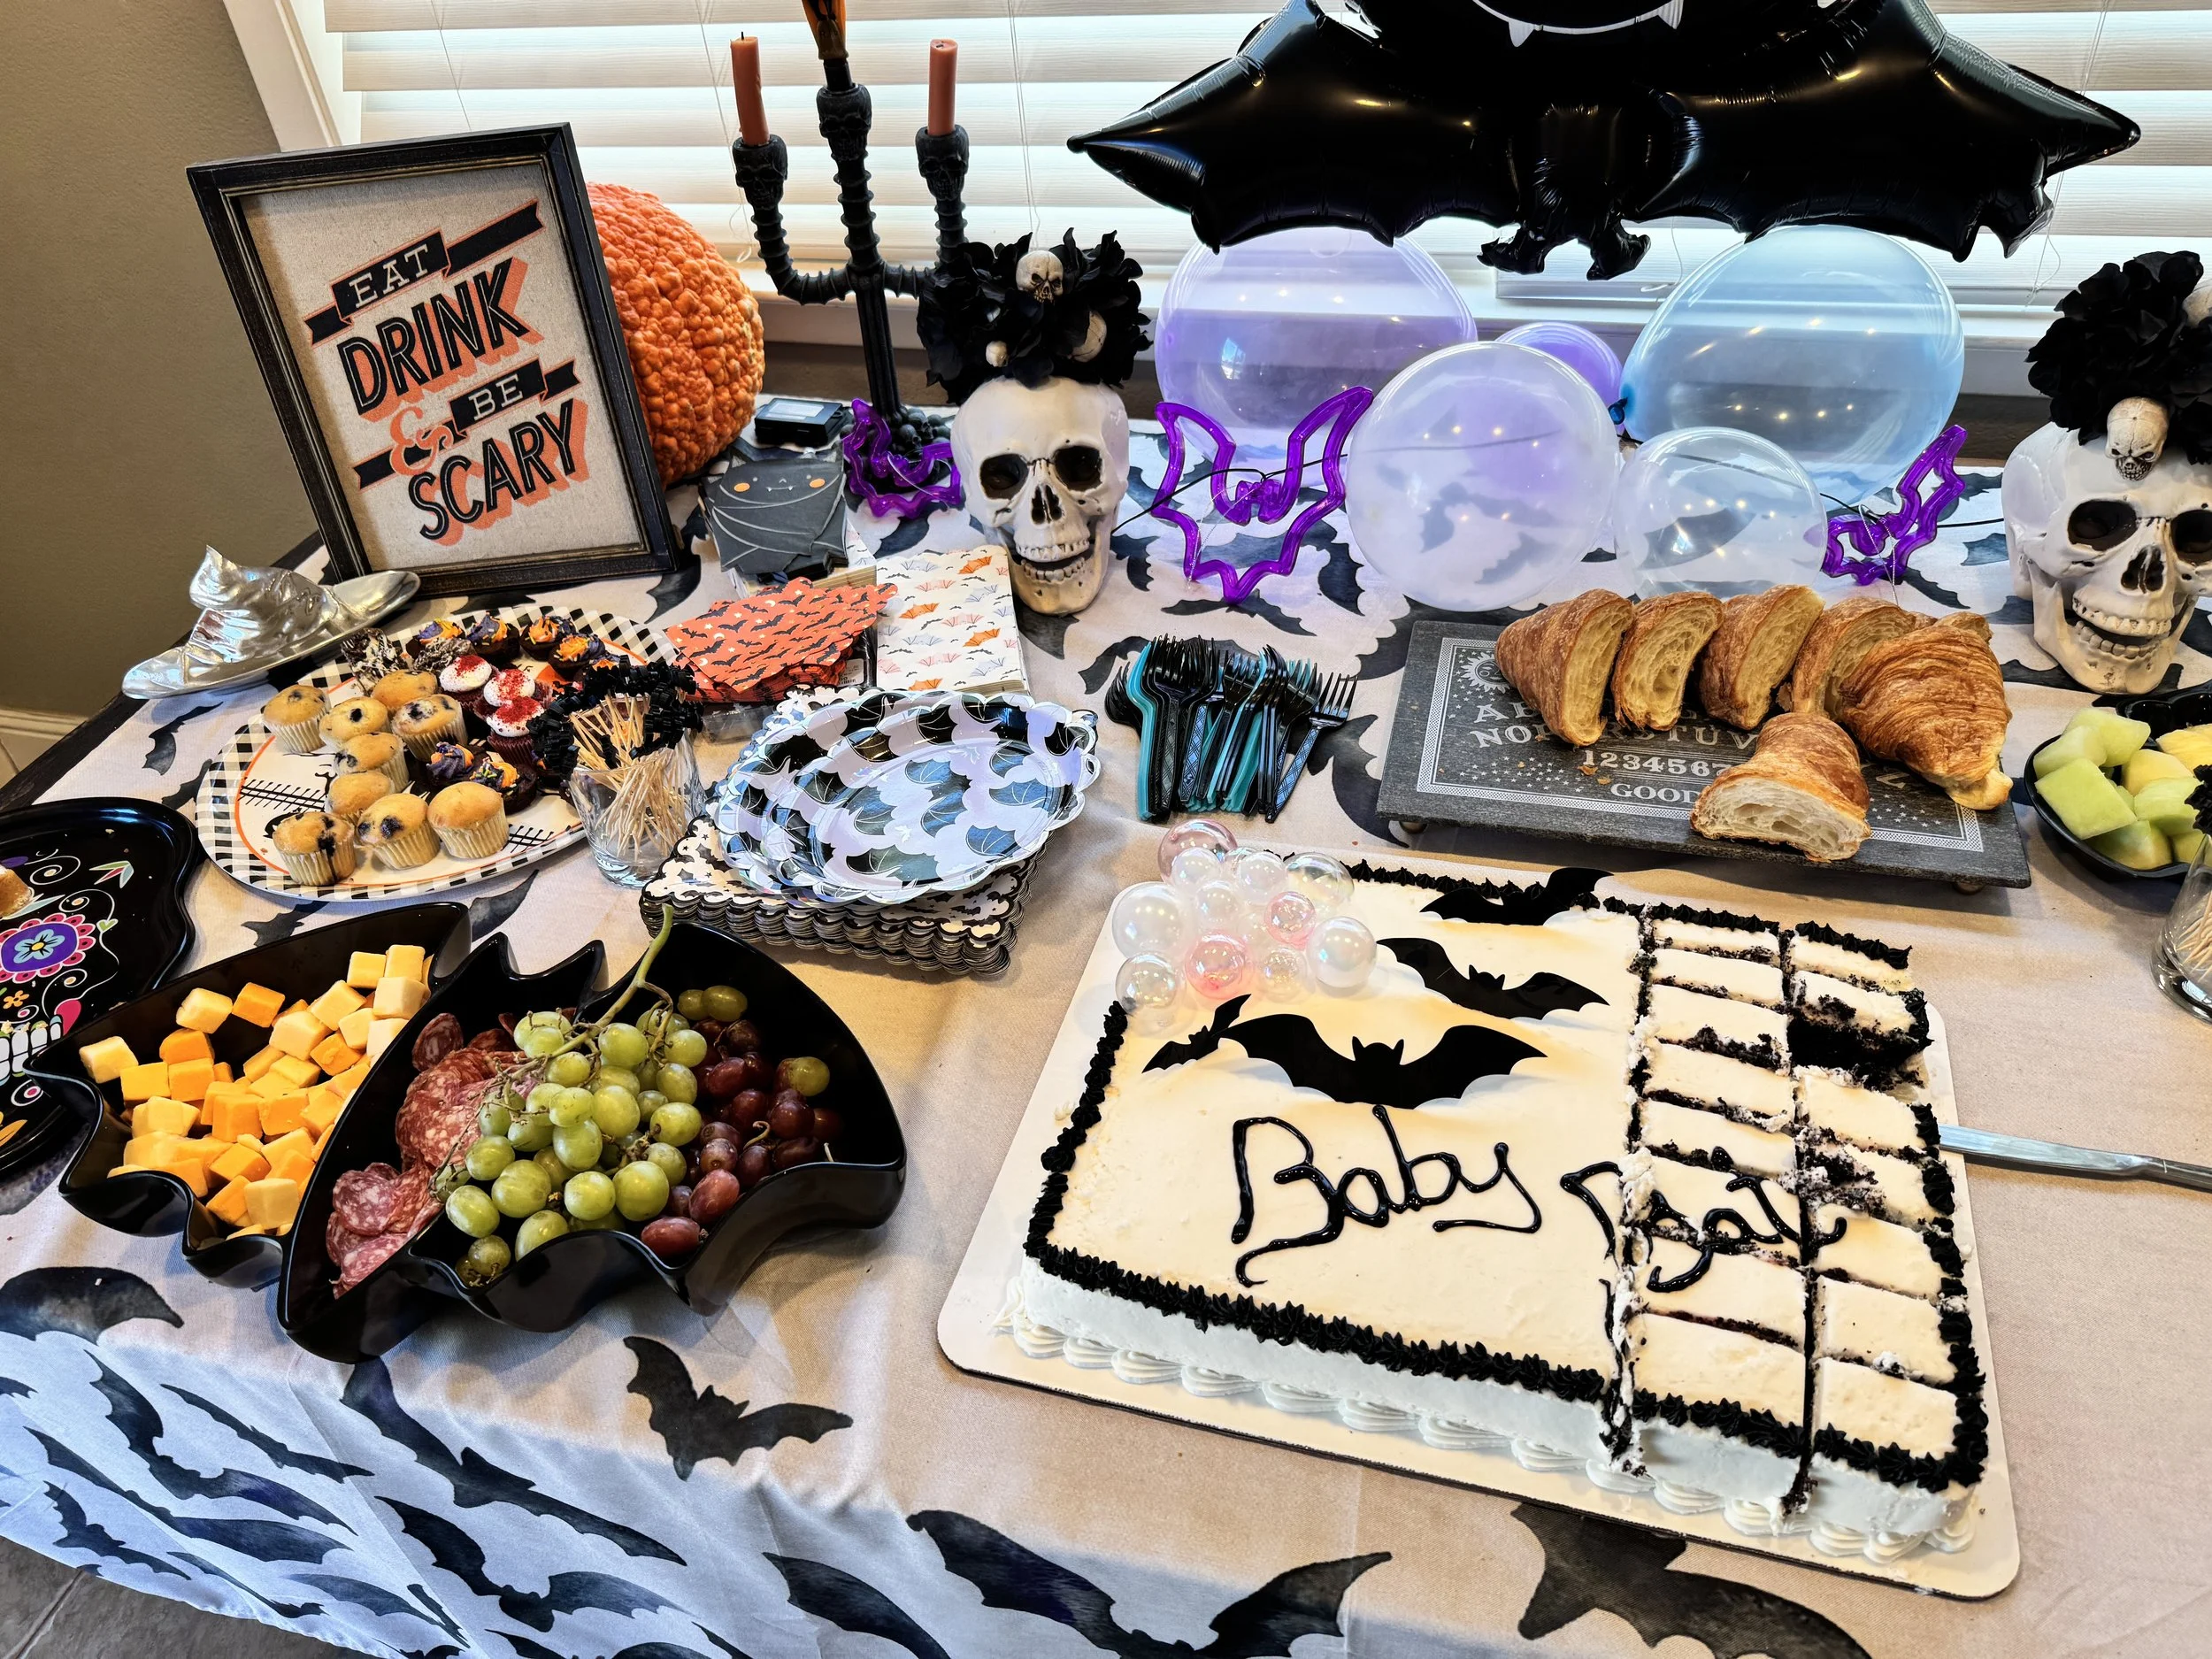
I absolutely loved this theme. We had about 60 people at the baby shower (it was co-ed) and I got endless compliments on the theme/decor. My daughters nursery is also bat themed, but that is for another post.

Plus Size, Insulin Resistant and Gestational Diabetes. How being pregnant changed how I eat.
The juxtaposition between my OB and the gestational diabetes clinic that I was referred to was stark. The clinic was full of friendly nurses, dietitians and social workers who made navigating not only the gestational diabetes but my insulin resistance so much easier.
This blog contains links to products. As an Amazon Associate, I earn from qualifying purchases.
Getting the Gestational diabetes diagnosis when I was pregnant with my daughter was frustrating, but mostly scary. I had gone through 2 years of IvF to finally get pregnant and be told at 12 weeks pregnant I had gestational diabetes.

There is still questions to whether or not I actually had gestational diabetes because I was diagnosed from a high fasting glucose (It was 97 and they wanted to see a 95 or lower), but after the glucola drink my numbers were very normal. What I have since learned is that my morning glucose is always right around 100 or a couple of points higher and I may have Insulin Resistant Dawn Phenomenon.
I was diagnosed with Insulin Resistance when I was a teenage and diagnosed with Poly Cystic-Ovary Syndrome (PCOS). I had been told time after time, “don’t eat carbs” and then I would not eat carbs, still gain weight and then go back to the doctor and be told “you’re eating too many carbs”. This led to years of cutting carbs out, eventually eating carbs, gaining weight and then trying to crash diet.
While going through IvF, my prior OB-GYN stopped accepting my insurance, so once I finally got pregnant and graduated the fertility clinic, I had to find a new OB-GYN. Well, I chose wrong and ended up with a fat-phobic doctor.
Something important to note, is that with each of my IvF treatments, I would gain weight. This led to my highest weight ever. When I got pregnant I was 309 lbs. The first time the doctor saw me, she immediately jumped into doing a glucose test. I was 12 weeks pregnant and had just had an A1C done a couple of days before this appointment and my level was mid-range.
I got the glucose test and, as mentioned above, had a slightly high fasting glucose. When we met with the doctor again, I asked if the test should be redone since I didn’t have a high glusoce after eating. She said “Honestly, you probably have type II diabetes and we are just finding out about it”.
To which I responded, “I just got an A1C test that was normal, so I don’t think that is true.”

Happy and healthy at 38 weeks pregnant
She backed off during that meeting, but the rest of my pregnancy was more of the same. I swam laps almost every day and my husband and I took frequent walks. I only gained 7 lbs in the whole pregnancy but there was an appointment where I gained 3 or 4 lbs (water weight, it was gone the next day) and she said I “need to get up off the couch and move”. I had swam more than a mile the night before.
The juxtaposition between my OB and the gestational diabetes clinic that I was referred to was stark. The clinic was full of friendly nurses, dietitians and social workers who made navigating not only the gestational diabetes but my insulin resistance so much easier.
I took my diagnosis very seriously, I was not going to let me eating affect my daughter negatively.
You need carbs, but you should be eating them in small amounts throughout the day. The following is the schedule they had me on. The times in parenthesis are based on a 6:30am wake up and 10:00pm bed time, this would be adjusted based on wake up time.
Morning Snack (7:00am): 15 - 30 grams of carbs
Breakfast(10:30am): 15 - 30 grams of carbs
Lunch(12:00pm): 45 grams of carbs
Afternoon Snack(3:00pm): 15 -30 grams of carbs
Dinner(6:00pm): 45 grams of carbs
Pre-bed snack(9:30pm): 15 - 30 grams of carbs
Another habit I picked up while doing this was going on a small walk after lunch and dinner. This walk is typically 10 mins or so, just getting up and keeping your body moving for ten minutes. If I do the dishes after dinner I try and move around a lot while doing them, or turn on some music and dance a little.
Keeping up with this carb break down has been imperative in my weight loss journey post-baby. When I was still on maternity leave I was busy taking care of our daughter so I had to make sure I had good snacks to easily grab, and now that I am back at work it is even more important.
Below are my favorite snacks that are between 15 and 30 grams of carbs in convenient prepackaged servings:
Nature’s Garden Probiotic Yoggies - These come in packages that are exactly 15 grams of carbs. They are delicious and my favorite pre-bed snack.
Madegood Granola Bites - Similar to Yoggies, these come in a perfect snack sized pack. They are perfect on the go.
Hillshire Snacking Plates - Some of these are less than 15 grams of carbs so I would like to pair them with a pack of nuts. But these are perfect for an afternoon snack, its like your own little person Charcuterie board.
Planters Variety Pack Nuts - For me, limited serving size is always best. I love these nuts as an easy grab for in the car or taking with me for work.
Entenmann’s Chocolate Donut - Ok hear me out. There are only 26 grams of carbs in these and this was the only thing I craved while pregnant. But most importantly, it is not about restricting what you eat, but about making sure that you are getting the right amount of what you need.
I love fruit and veggies so I always eat a healthy mix of those and easy to grab snacks. If you have gestational diabetes, just know that some things will make your glucose spike and there is no rhyme or reason to it. Life is about balance and it is ok to eat things that you love, as well as making sure you are getting healthy snacks as well.
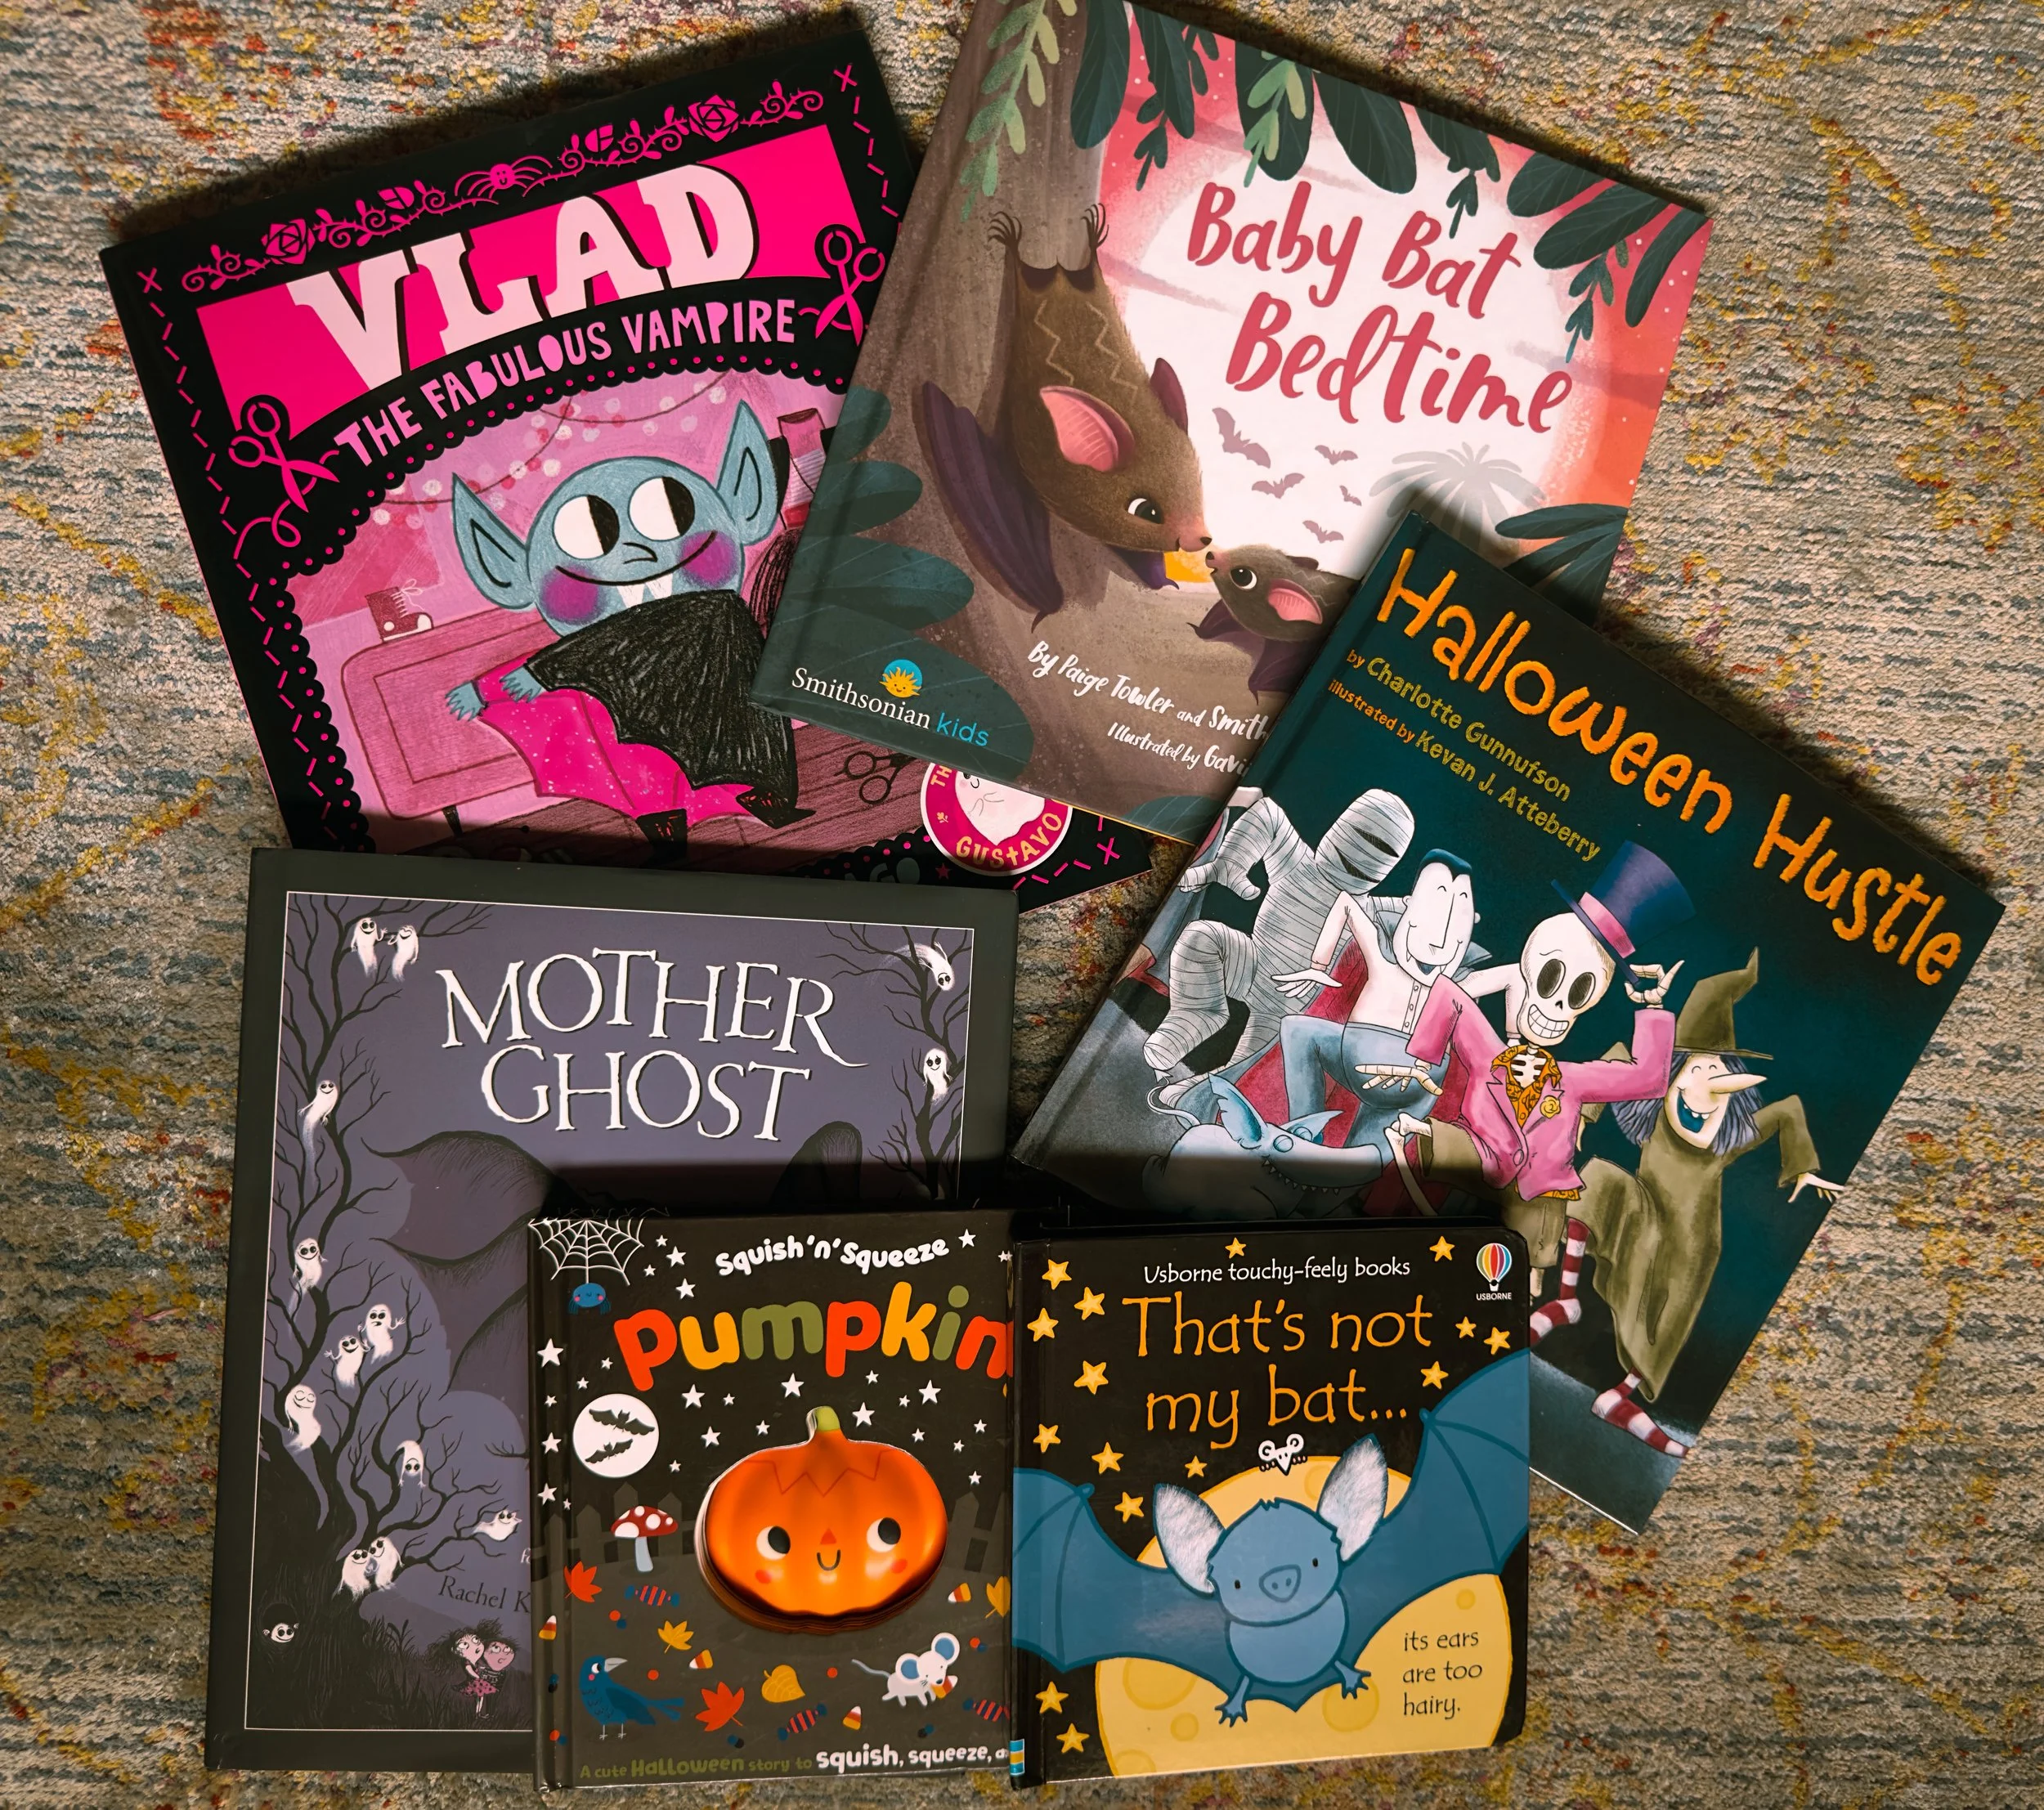
2025 Boo-Basket Books
Boo-Basket Books for kids aged 0-6
This post contains affiliate links. As an Amazon Associate, I earn from qualifying purchases.
Is it still July while I am writing this, yes. Do I have an unnatural obsession with Halloween and spooky season, also yes. But planning for a boo basket for your little one can sneak up on you.
Also, in this age of social media and influencers (myself included), a Boo-Basket is not necessary, it should be fun, not stressful and it is no reason to go into debt or try to keep up with the Draculas. Make it whatever you want and don’t think you have to do what someone else is doing.
As a fan of traditions, I put some thought into what I wanted my daughter’s boo-basket to be. This may change over the years, but for now it will be about kicking off the Halloween season. I will be buying ONE basket that I use year after year, the same as I did for Easter. In it, I plan to do pajamas we can decorate the house in, some sweet treats we can eat while watching Hocus Pocus later that evening, a spooky themed book, and an age appropriate toy. Simple, cute and seasonal.
A recent study from HarperCollins UK states that only 41% of children under 5 are being read to regularly. I think this is so important for children, and I have always hoped my daughter would have the same love for books that I have. I had a Bat themed baby shower and asked that everyone bring a book instead of a card. When I tell you our friends and family showed up, with some of the cutest spooky books that were perfect for our little doll.

So here is a break down of some of my favorites:
Vlad the Fabulous Vampire, By Flavia Z. Drago - This is a cute book about accepting yourself for who you truly are. Vlad has a secret he is trying to hide from his friends - he has pink cheeks. He later learns that his best friend also has a secret and that instead of trying to hide their true selves, they should just be themselves. This is easy to ready, but is a little longer so it works well for a single book night.
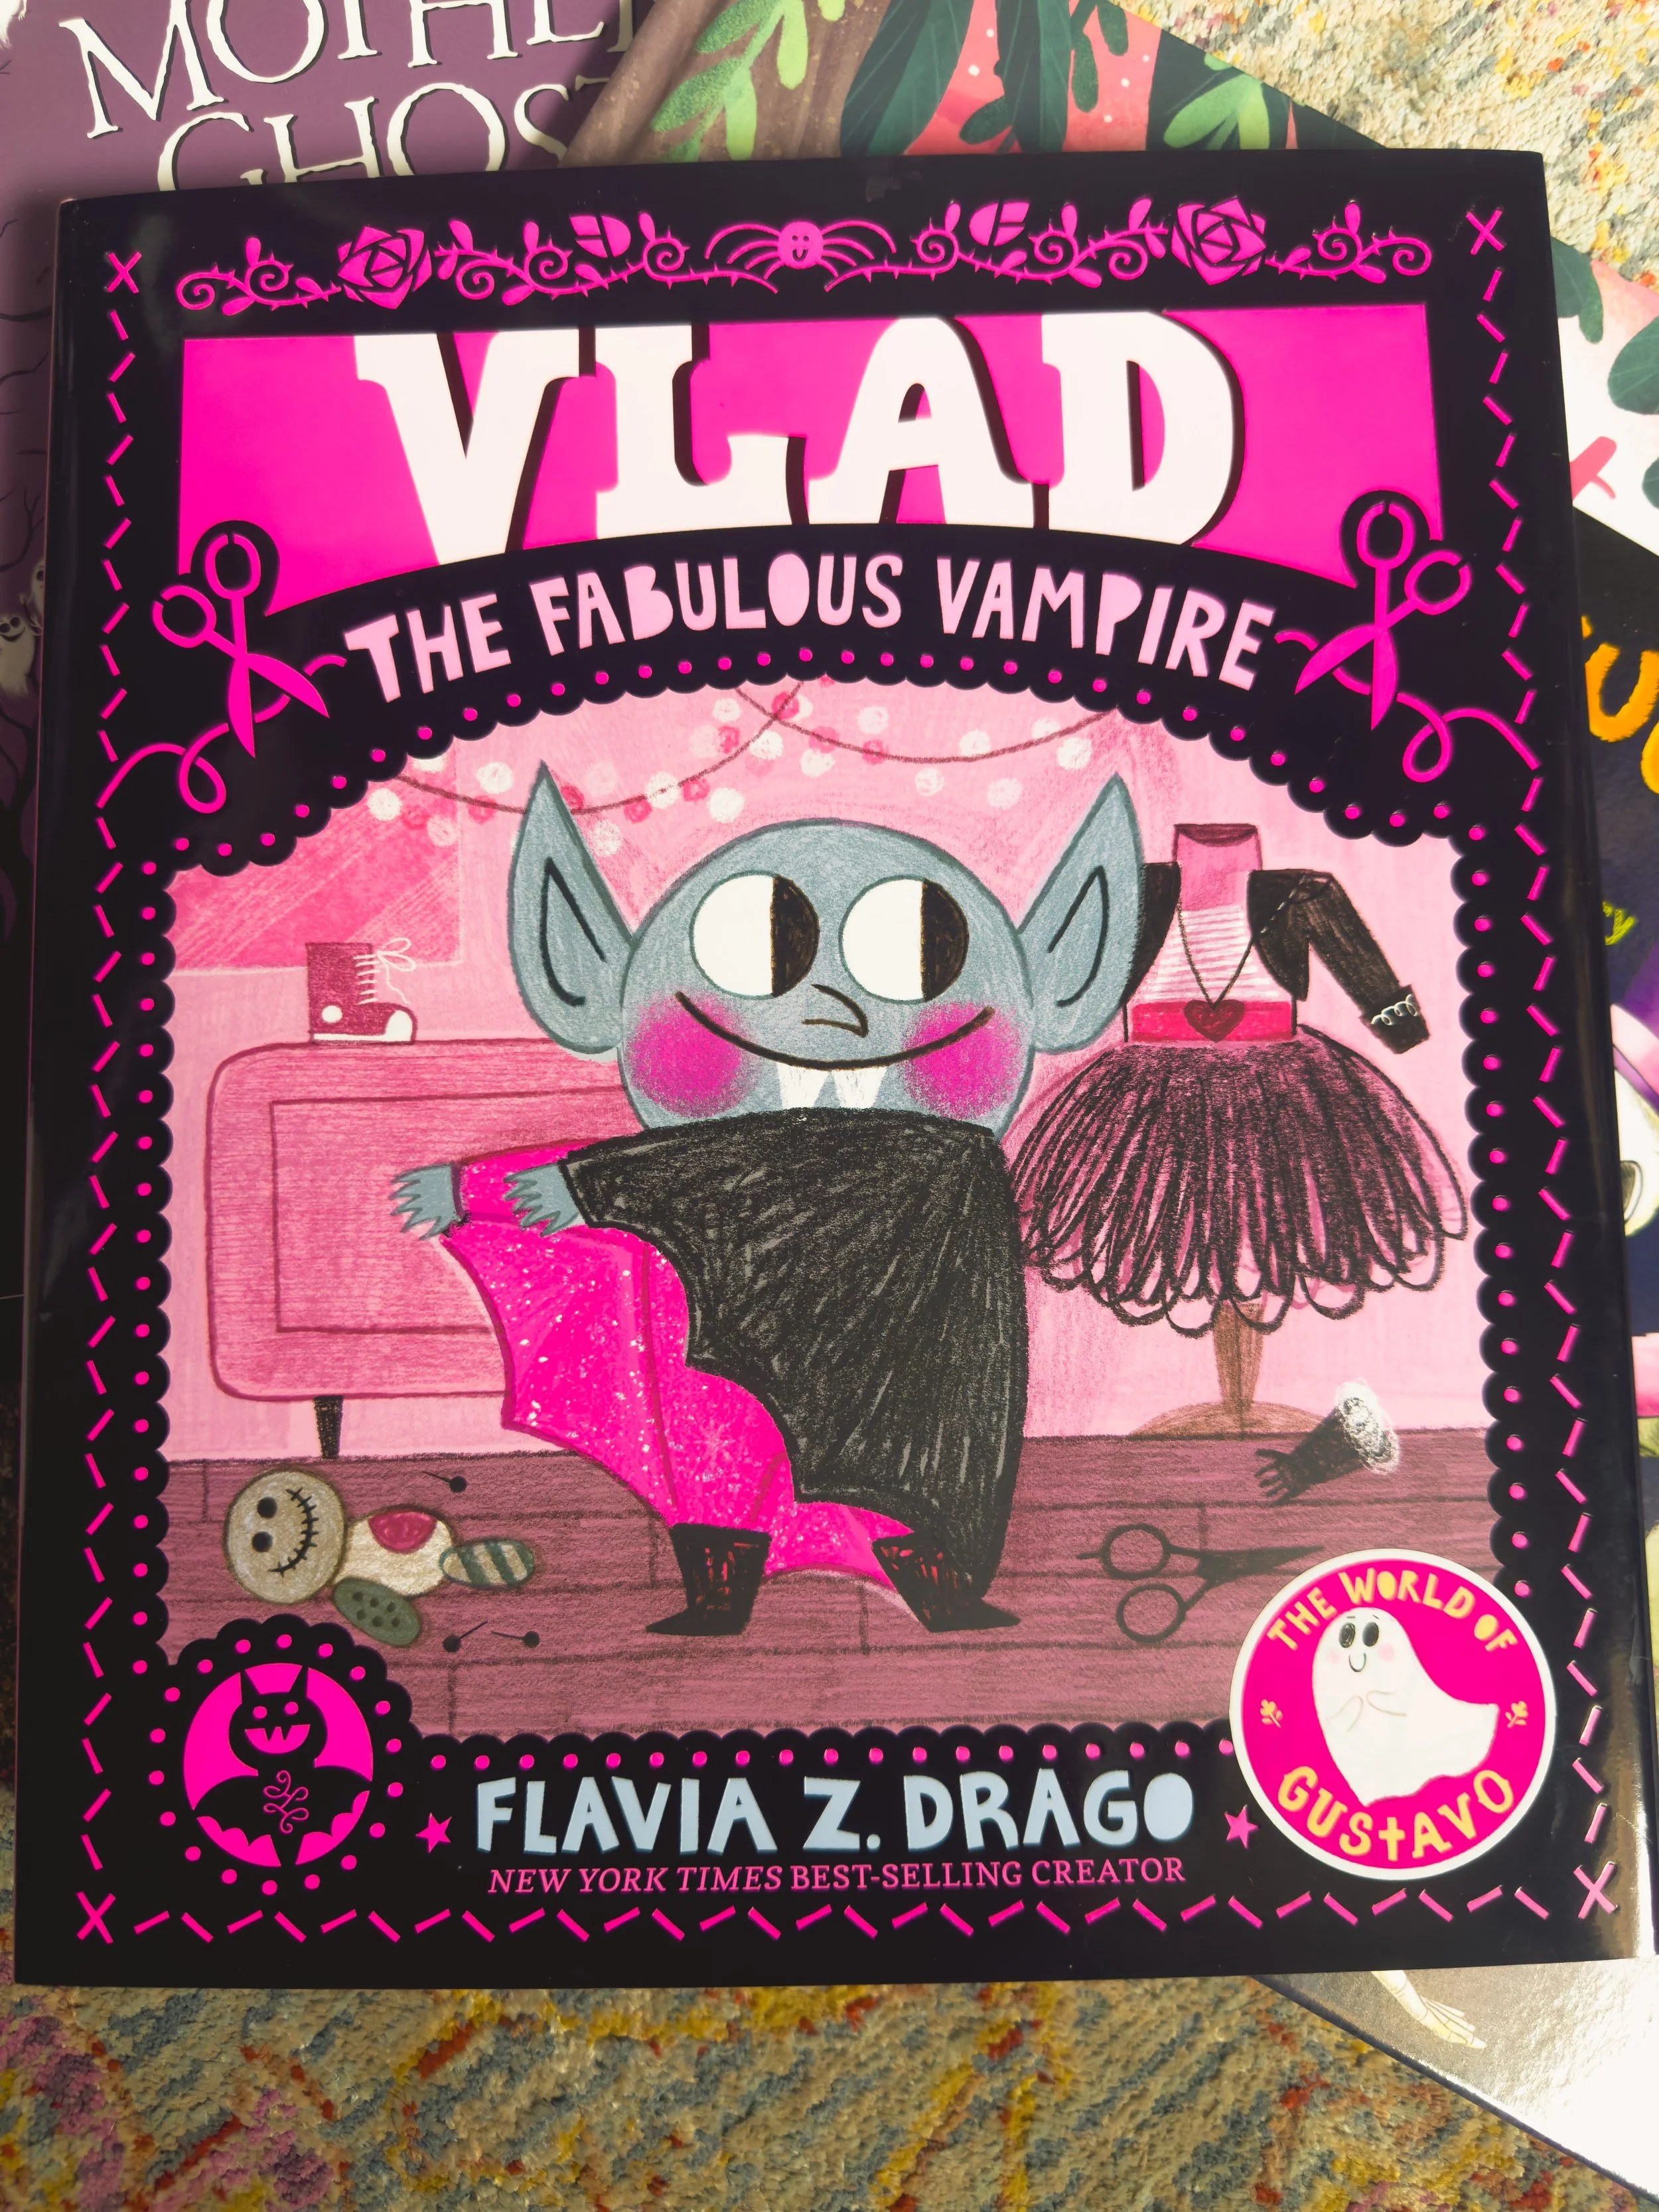
Vlad the Fabulous Vampire by Flavia Z. Drago - An adorable tale about loving who you really are
Halloween Hustle, By Charlotte Gunnufson - I love this book, this is one of my favorite things to read my daughter because it flows like a song. It is about a skeleton that is on his way to a Halloween party and keeps having accidents that lead to his bone scattering about. He glues, tapes and rubber bands himself back together all in the name of dancing the Halloween Hustle! I often find this book stuck in my head after I put my daughter to bed, but in a fun way.
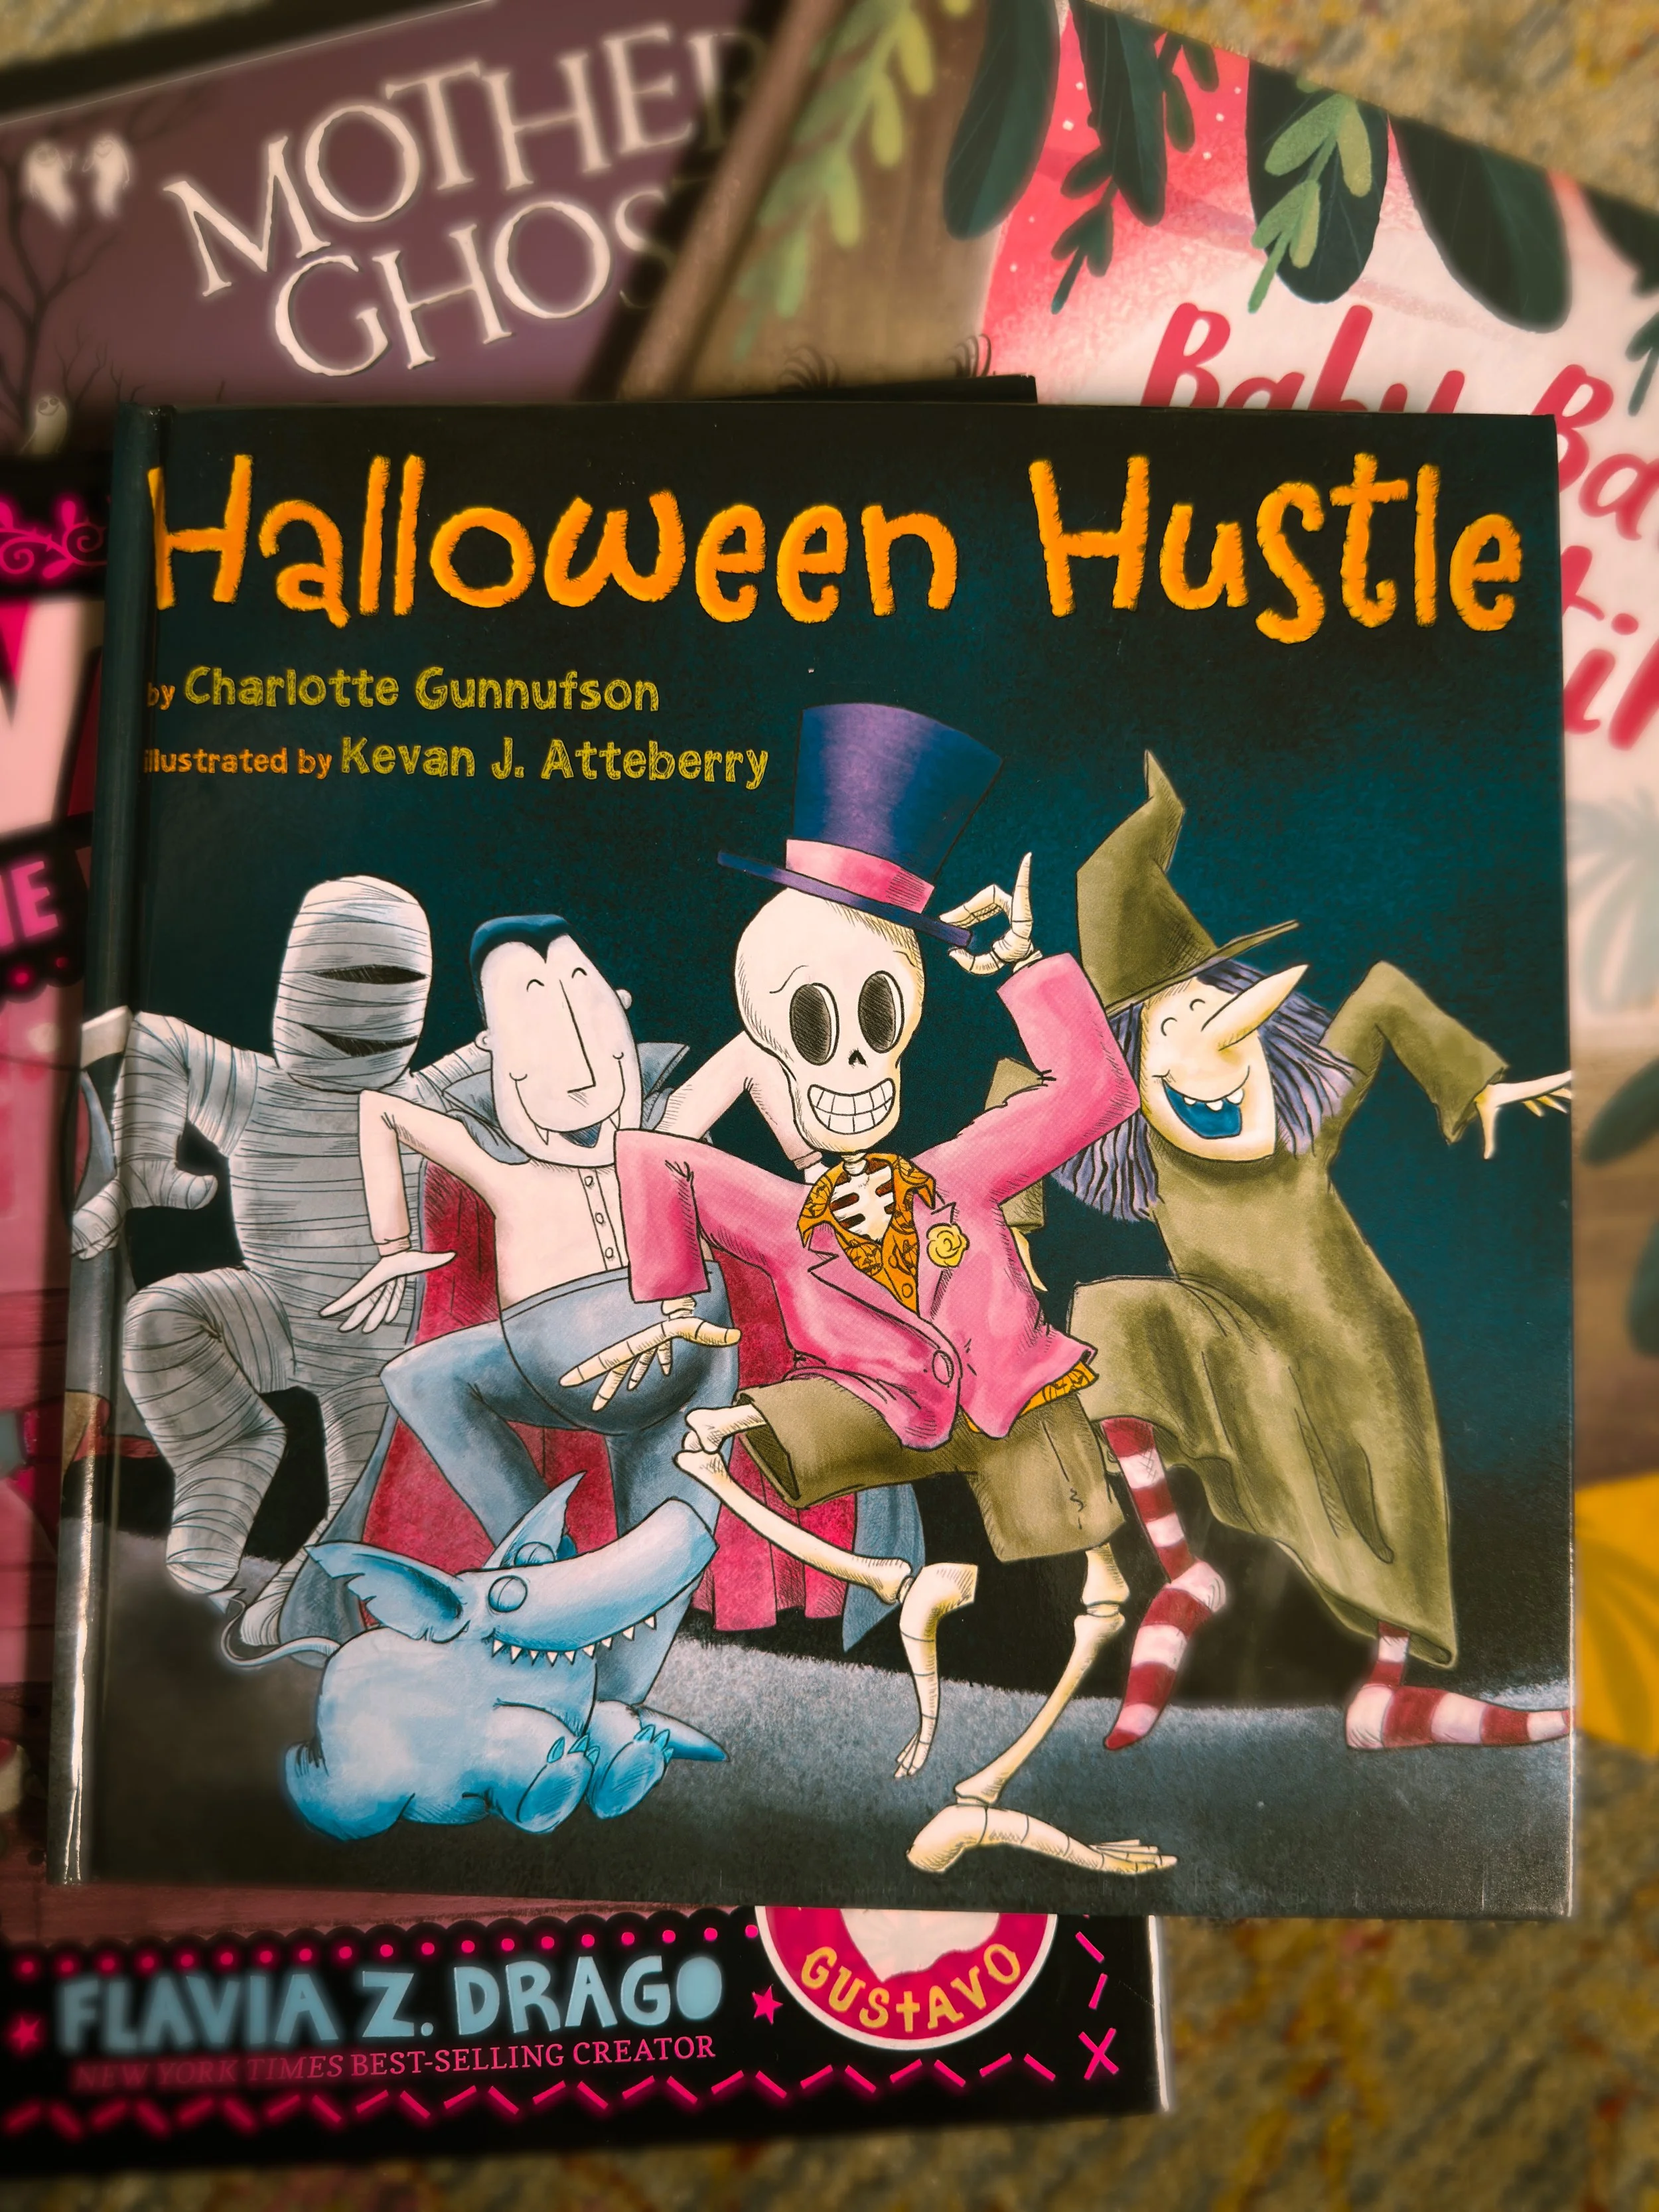
Halloween Hustle, by Charlotte Gunnofson - I sing “Bones Scatter, What a Clatter, Spine is like a broken ladder” all the time.
Baby Bat Bedtime, by Paige Towler and the Smithsonian Bat Lab - A cute bed time story AND educational, sign me up! The story is about a baby bat that isn’t ready to go to bed when the sun starts to rise. But Mama bat knows just what to do. This book also has gorgeous illustration by Gavin Scott. If that weren’t enough, the back of the book has an All About Bats section with information and photos from the Smithsonian Bat Lab, including a section on how to help bats. This is one of the books I got for our baby shower that I cannot shut up about!
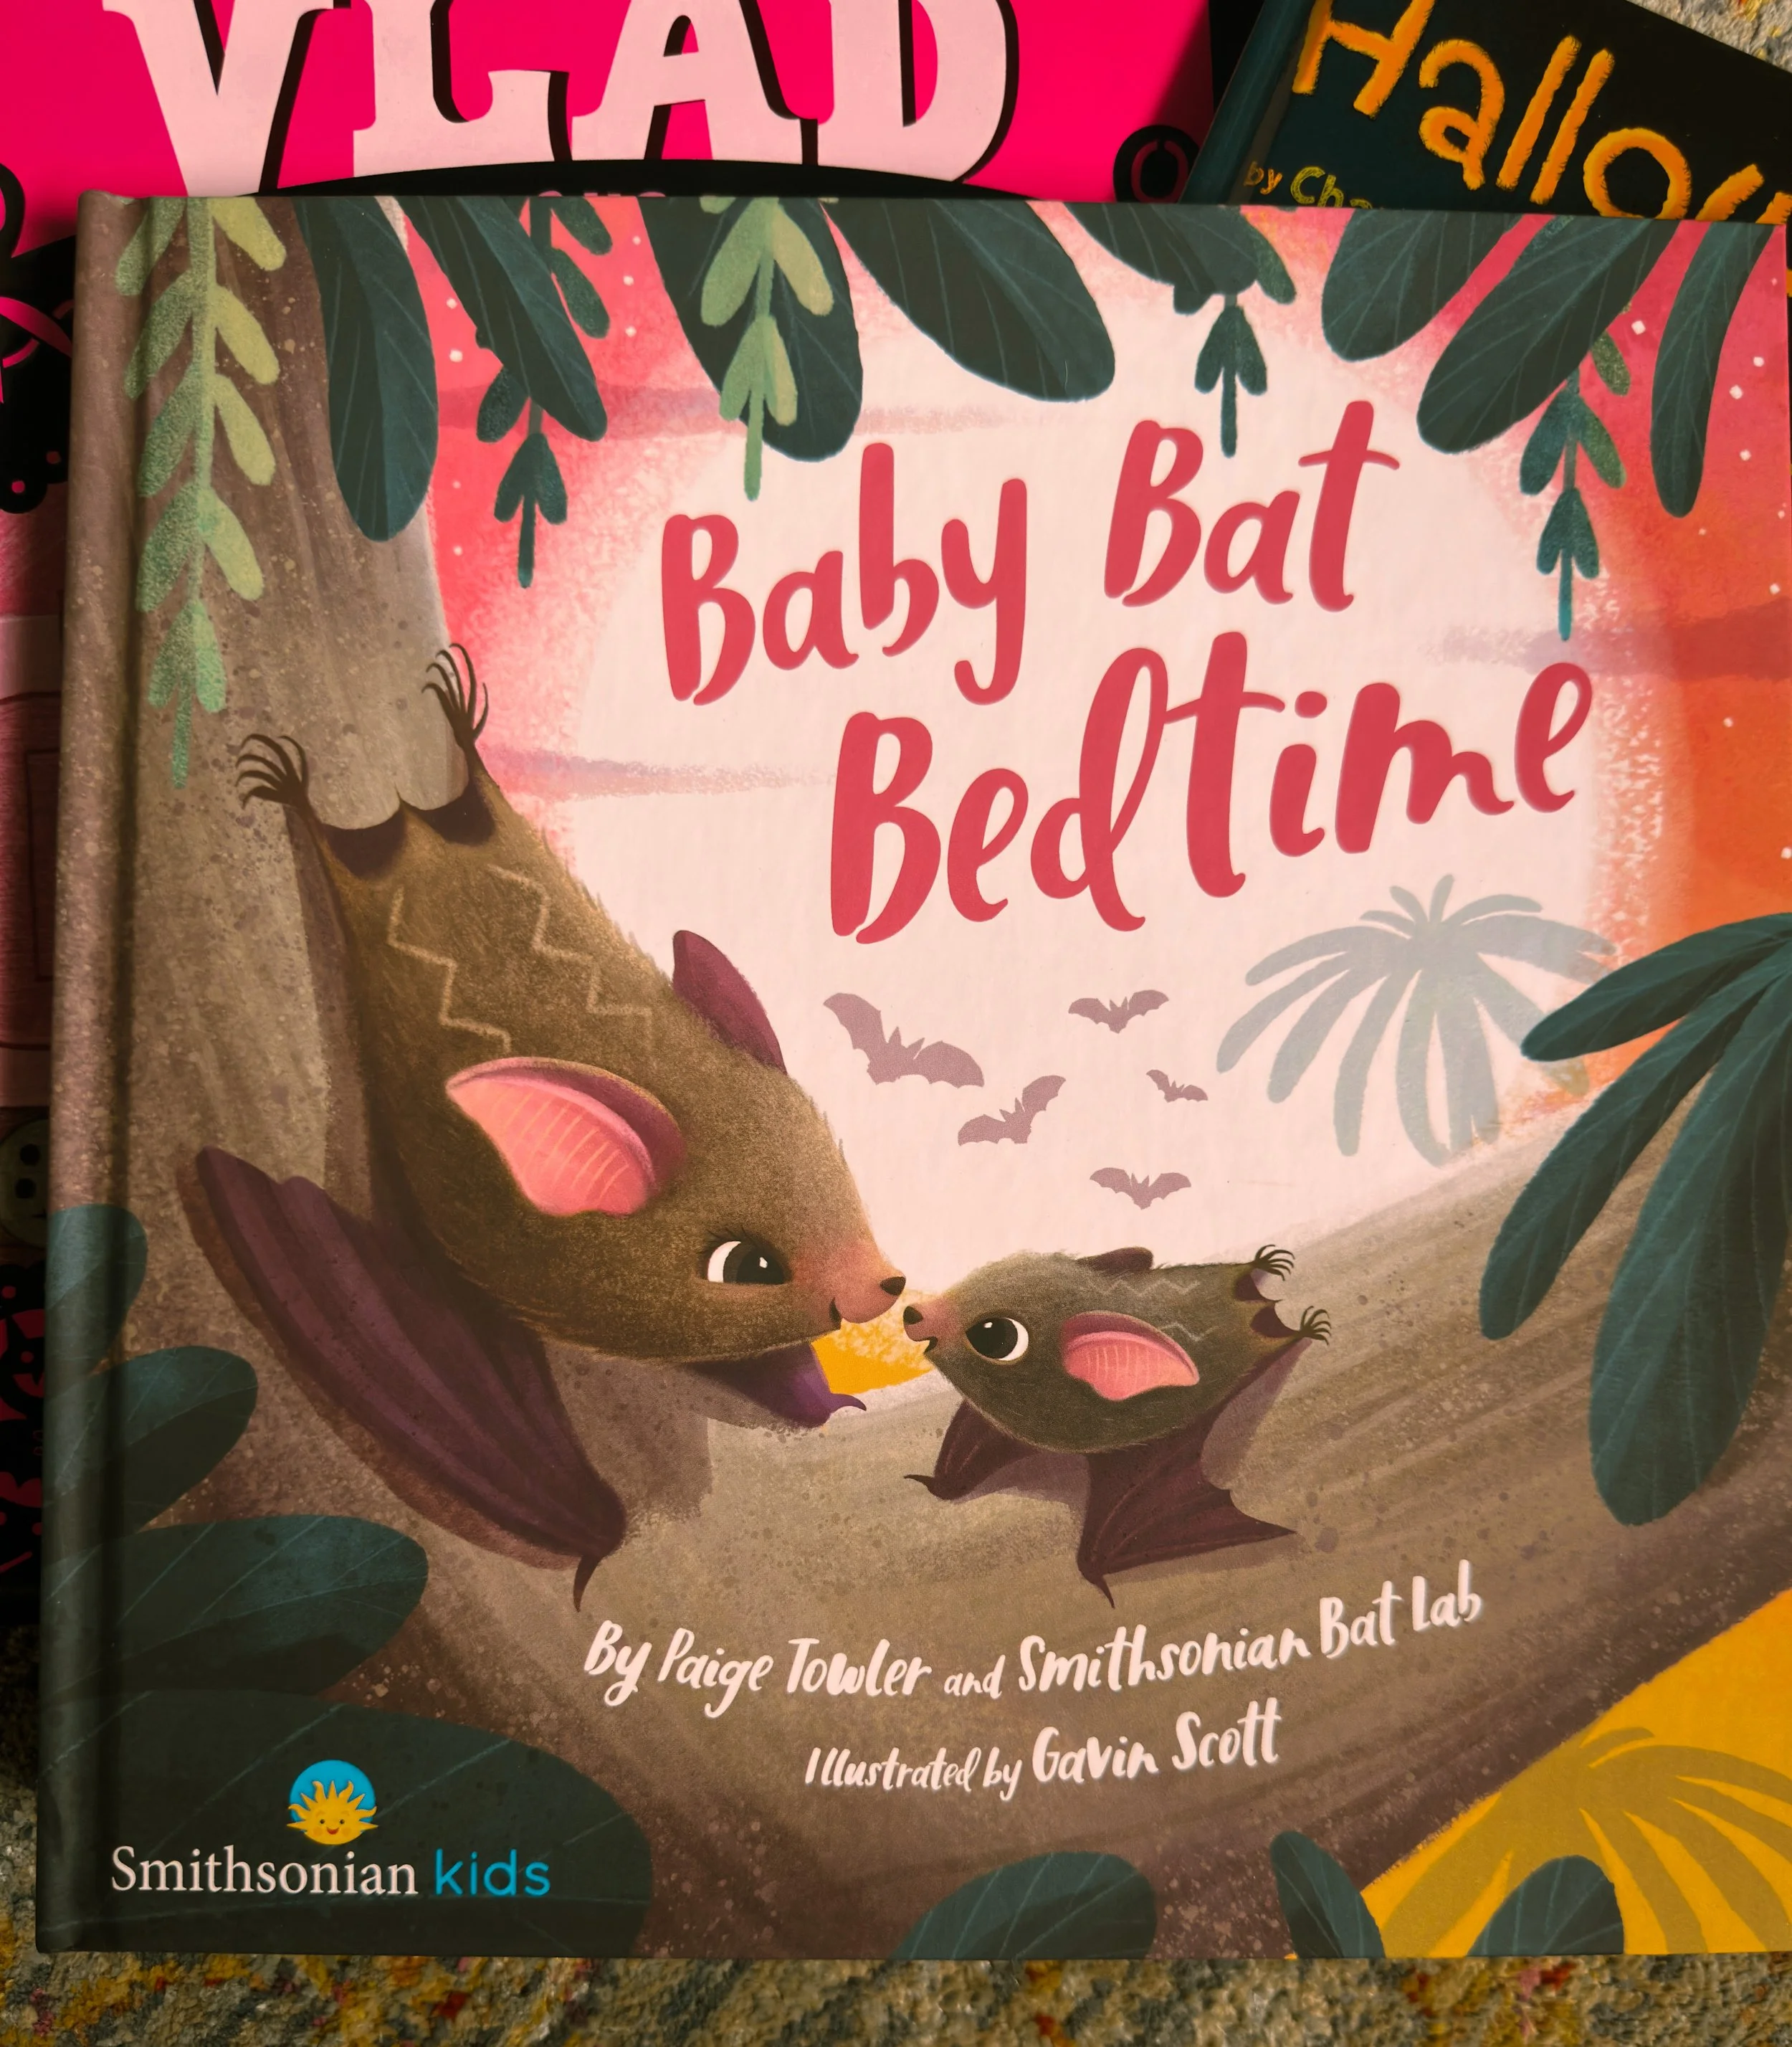
Baby Bat Bedtime, by Paige Towler and Smithsonian Bat Lab - Educational, cute and gorgeously illustrated by Gavin Scott.
Mother Ghost Nursery Rhymes for Little Monsters, By Rachel Kolar - These nursery rhymes are going to sound all too familiar but with a nice spooky twist. Rhymes such as “Mary had a Little Ghost”, “Hey, Diddle, Diddle Black Cat with a Fiddle” and “Zombie Miss Muffet”. The illustration was done by Roland Garrigue and gives an extra spookiness to this book. My daughter is only 8 months, but I feel like this book would be particularly enjoyable to 2-4 year olds.
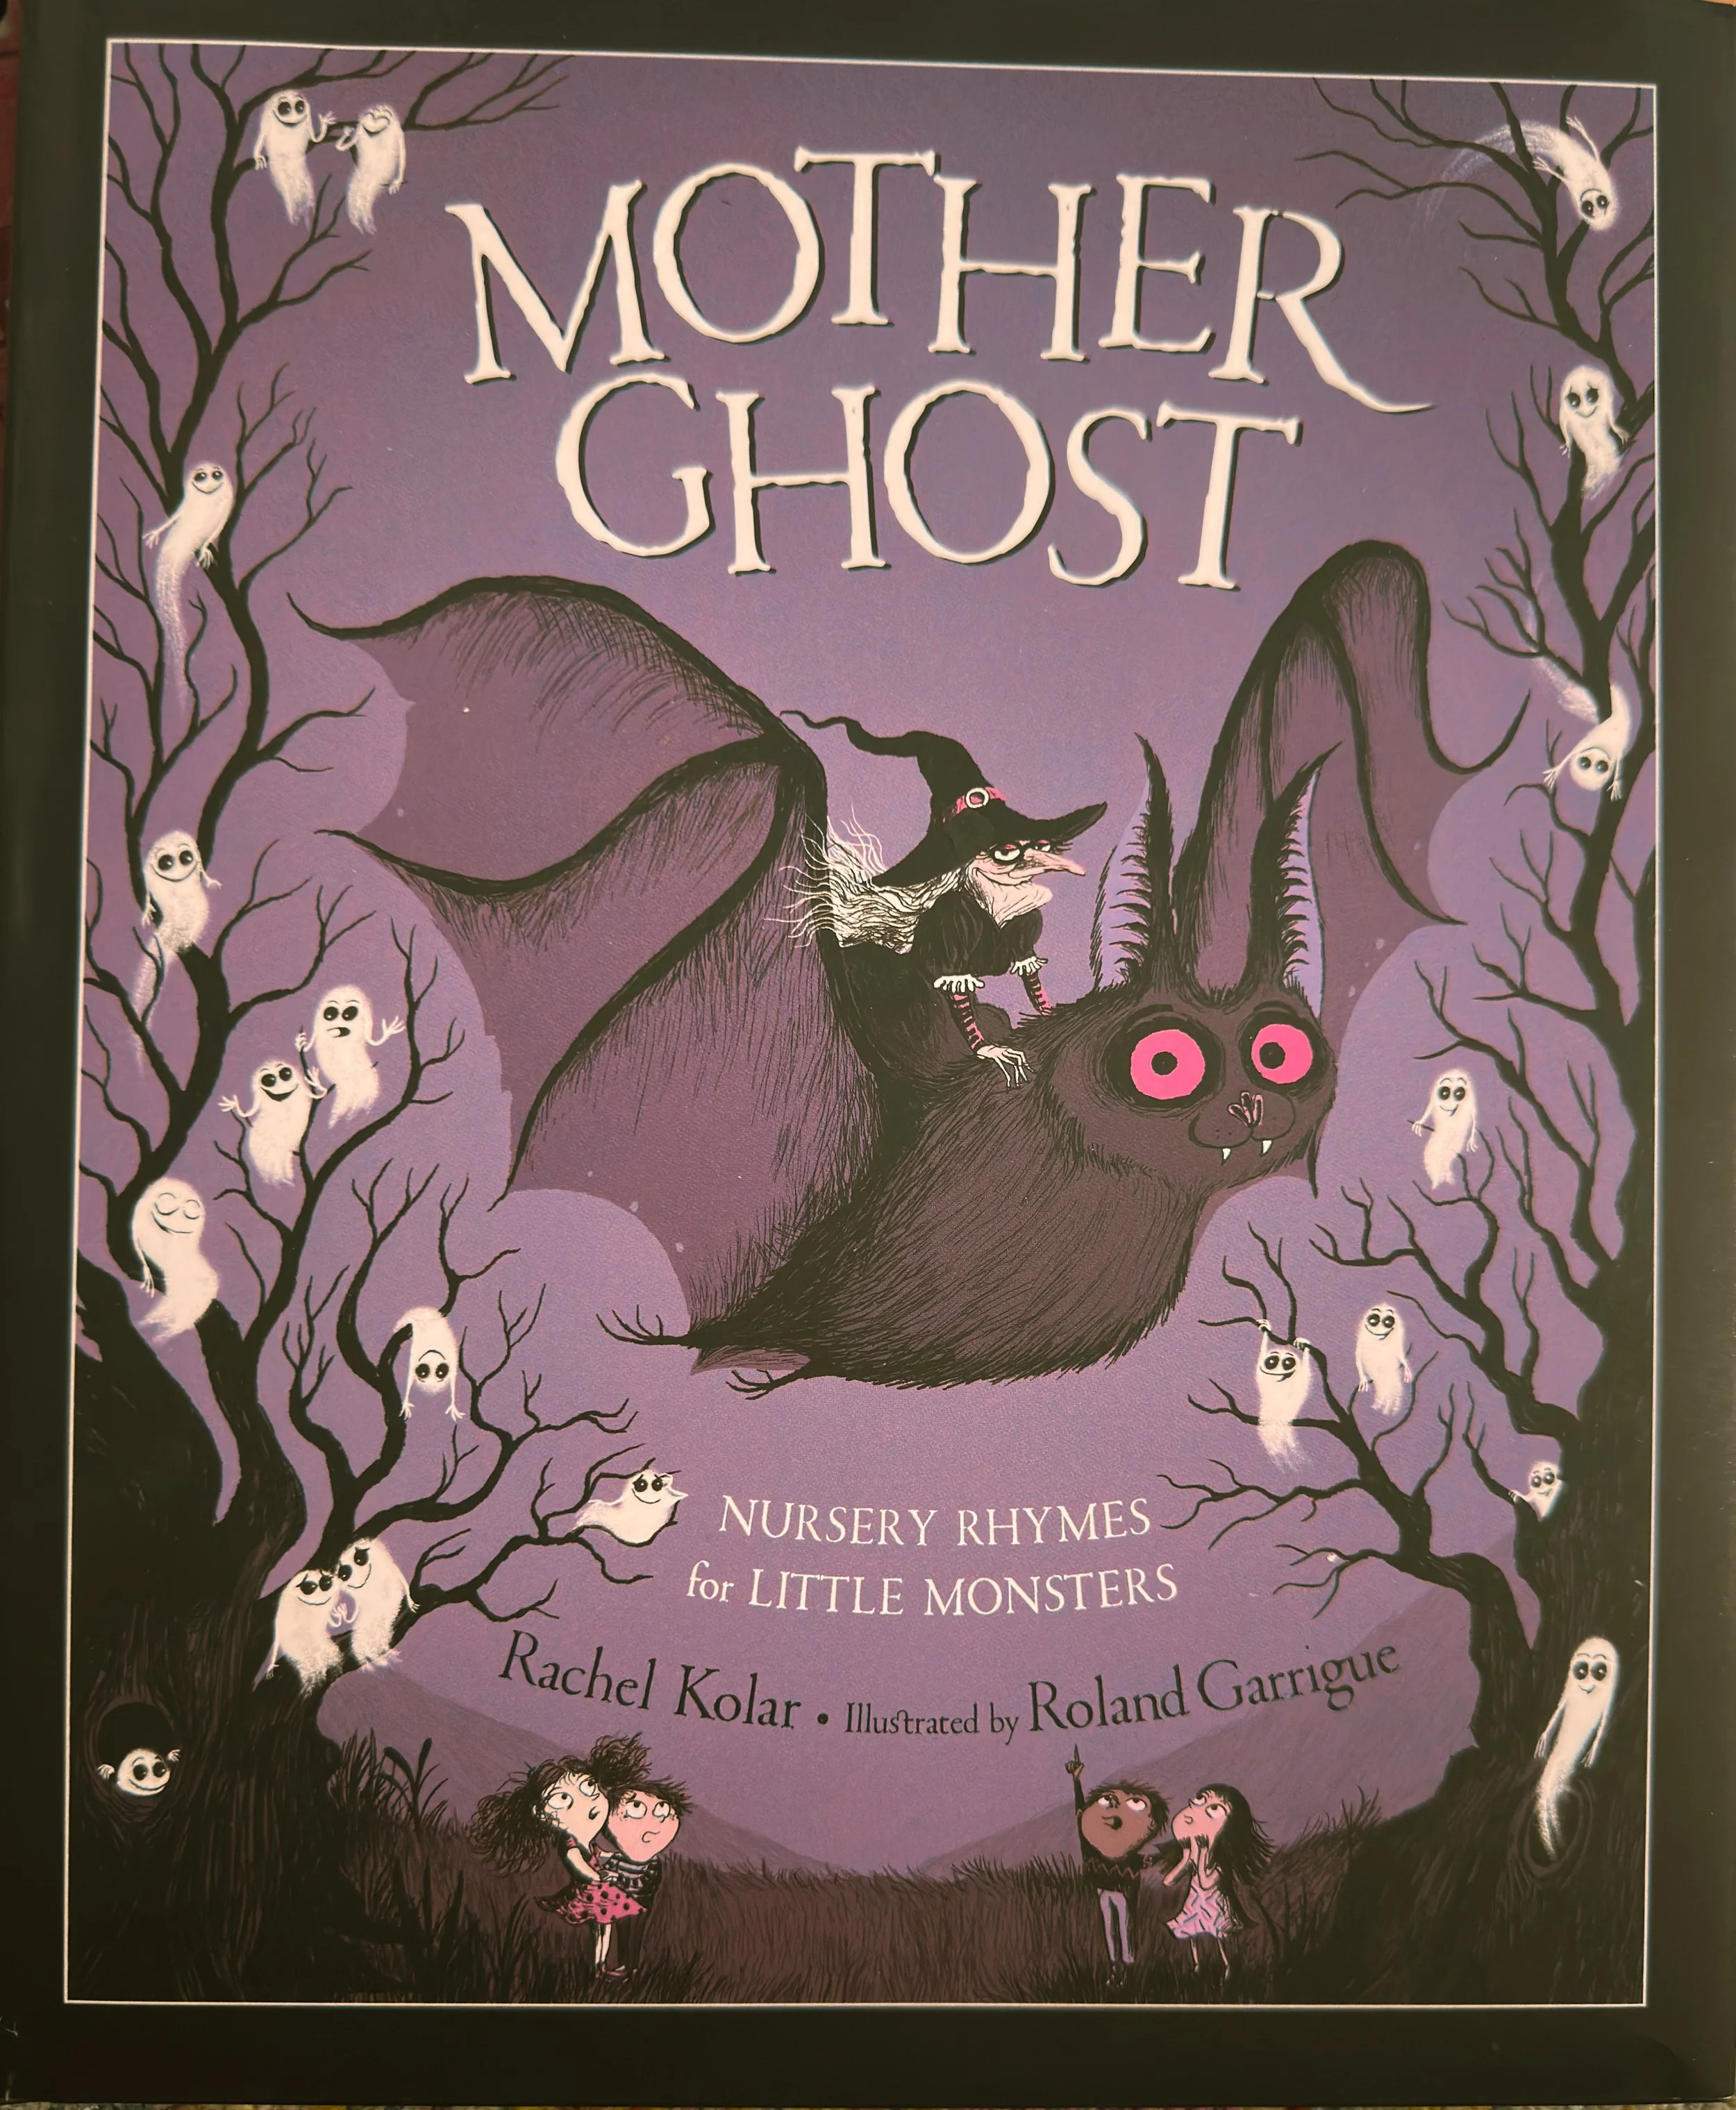
Mother Ghost Nursery Rhymes for Little Monsters, By Rachel Kolar - a spooky twist on all your favorite nursery rhymes.
Some other notable mentions:
Squish’n’squeeze Pumpkin! This is great for smaller kids who want to touch everything they see. The center of the book is a squishy pumpkin on each page. My daughter loves to grab it. You are also searching for something on each page so its interactive.
That’s Not My Bat… What kid doesn’t love a touchy-feely book. Each page has a different part of the bat that the kids can touch and associate with different descriptor words associated with that feeling such as “fuzzy”, “rough” and “fluffy”.
This will be my daughters first spooky season and I cannot wait to put together a boo basket for her! Books are so important and I love having seasonal ones that I can rotate out throughout the year.
What is your favorite spooky kids book?